How to Get There
From the Security Configuration Menu, choose option 1.
What it Does
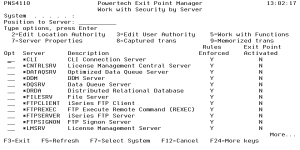
The Work with Security by Server panel displays a list of all of the servers and whether they have location or user authorities specified for any/each server. From the Work with Security by Server panel, you can work with Server Properties, Server Functions, Location Authorities, User Authorities, Captured Transactions, and Memorized Transactions.
Options
2=Edit Location Authority
To create or maintain Location authority rules, enter a 2 (Edit Location Authority) next to a server to open the Work with Security by Location panelWork with Security by Location panel. See Location RulesLocation Rules.
3=Edit User Authority
To create or maintain User authority rules, enter a 3 (Edit User Authority) next to a server to open the Work with Security by User panelWork with Security by User panel. See User RulesUser Rules.
5=Work with Functions
Enter 5 (Work with Functions) next to a server to display the Work with Security by Server/Function panel. Use the Work with Security by Server/Function panel to see a list of functions for a server, and to edit function location authorities and function user authorities.
7=Server Properties
Enter 7 (Server Properties) next to a server to display the Change Server Function Rule panel
8=Captured Trans
To work with Captured transactions, enter an 8 (Captured Trans) next to a server to open the Work with Captured Transactions panel
9=Memorized Trans
To work with Memorized transactions, enter a 9 (Memorized Trans) next to a server to open the Work with Memorized Transactions panelWork with Memorized Transactions panel. If any transactions exist, a list of those transactions subsetted by the selected server will be displayed. See Memorizing TransactionsMemorizing Transactions.
Press F23 to see additional options.
Field Descriptions
System
System indicates the target of any operations you perform. When you add rules, for example, those rules will be sent to, and will affect processing on, the System named.
Position To Server
This allows positioning to a starting point for the subfile.
Opt
Allows entry of a valid option for the function.
Server
The server ID is the name of the server that authority is being specified.
Description
The description of the server.
Rules Enforced
Indicates that Powertech Powertech Exit Point Manager for IBM i will enforce rules for this server. See also Exit Point Activated.
Exit Point Activated
Indicates that a Powertech Powertech Exit Point Manager for IBM i exit program is configured for this server. See also Rules Enforced.
See also Activating Powertech Powertech Exit Point Manager for IBM i.
Command Keys
F3 (Exit): Exit the current panel without processing any pending changes.
F5 (Refresh): Refreshes the panel and resets all available text fields.
F7 (Select System): Use this command key to work with data from a different System.
F8 (Captured trans): Goes to the Work with Captured Transaction panel.
F9 (Memorized trans): Goes to the Work with Memorized Transaction panel.
F12 (Cancel): Exit the current panel without processing any pending changes.
F13 (Display messages): Displays messages for user.
F14 (Work with submitted jobs): Displays jobs submitted from the current job.
F15 (Work with spooled files): Displays the user's print output.
F24 (More keys): Displays additional function keys (listed above).
