Telnet with Dynamic IP Address
This guide takes you through the basic steps to authenticate a telnet request from a PC using a dynamic TCP/IP address that is allocated when using DHCP.
Prerequisites
- Ensure that the SecurID software is loaded and the relevant software keys have been applied.
- SecurID controls a single subsystem, called 'ACEDTI’. This should be reviewed on a regular basis to ensure that it is active. Where possible, you should modify your system start-up program to run the command @ACE/STRACEDTI.
- Any IBM i profile name(s) used when following this guide, must be able to authenticate with an RSA Authentication Manager.
- Additional software, referred to as “Remote Authentication software” must be installed. For details, see the Installing SecurID Remote Authentication section in the Powertech RSA SecurID Agent for IBM i Installation Guide on the Fortra Support Portal.
Authenticating Telnet Requests from a Dynamic IP Address
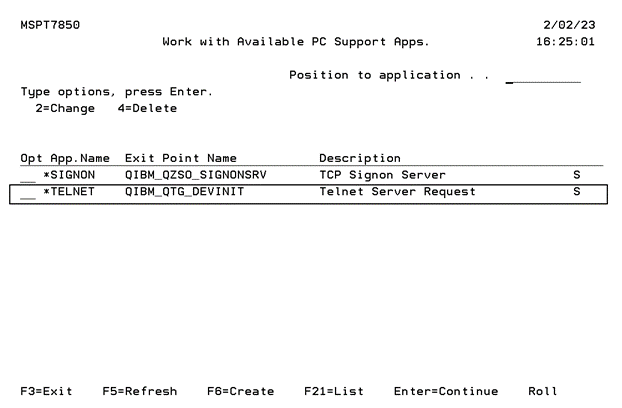
- From the Master Menu, select option 10, Work with Client Application Availability. The Work with Available PC Support Apps screen opens.
- If application Name *TELNET does not exist in the displayed list, select F6 (Create) to select it from a list. If *TELNET does exist, choose it using option 2. The Maintain PC Support Availability screen appears. Enter the following values:
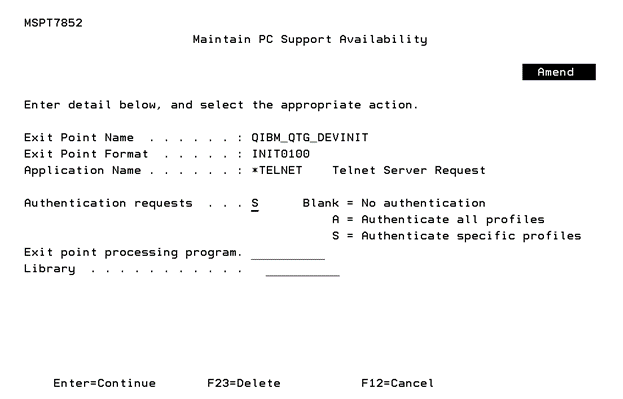
Authentication requests: S
Press ENTER.
Press F3 to exit the program, and return to the Master Menu.
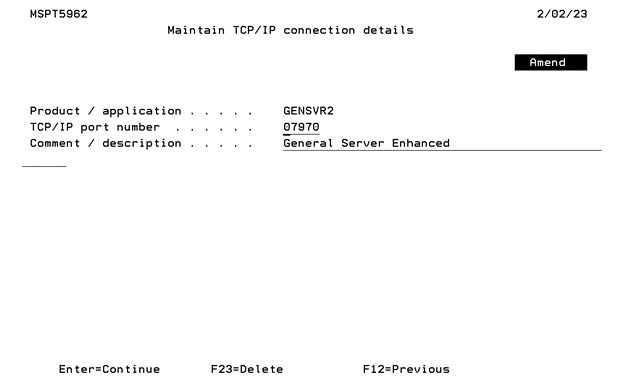
- From the Master Menu, select option 8, Work with TCP/IP Port Connections.
-
Press F6 (Add) if Product GENSVR2 does not exist in the displayed list, to choose it from a list. If GENSVR2 does exist, use 2 to select it. The Maintain TCP/IP Connection Details screen appears.
- While still in Work with TCP/IP Connections, select F6 (Add) if Product RMTSDIAUT does not exist in the displayed list. If RMTSDIAUT exists in the list then enter 2 next to it and press ENTER. The Maintain TCP/IP connection details screen appears.
- From the Master Menu, select option 4, Activate/de-activate Remote Authentication.
- Press ENTER.
- From the Master Menu, select option 50, End SecurID Agent Subsystem (ACEDTI).
- From the Master Menu, select option 40, Start SecurID Agent Subsystem (ACEDTI).
- Reboot the PC.
- Log on to the appropriate PC.
- Attempt to start a telnet session to the IBM i:
- Enter the requested details in the SecurID Challenge window that should appear on the PC and click OK.
Enter / confirm the port number and press ENTER. This number must match the TCP/IP port number configured on the PC within the Settings window of SecurID Remote Authentication.
Press ENTER at the Maintain server control parameters screen. Press F3 to exit the program, and return to the Master Menu.
Enter / confirm the port number and press ENTER. This number must match the TCP/IP port number configured on the PC within the Settings window of SecurID Remote Authentication.

Press F3 to exit the program, and return to the Master Menu.
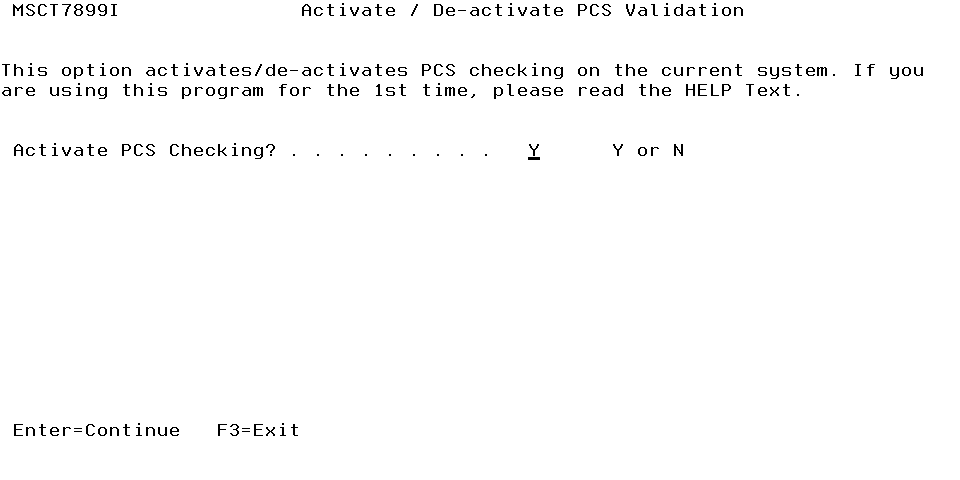
Set Activate PCS Checking? to Y.
For example:
Start > Run > telnet < IBM i >
Where:
< IBM i > is the name or TCP/IP address of the IBM i LPAR.
See Configuring SecurID Remote Authentication to map and sync IBM i users with the PC.
See Authenticating Exit Point Logon Requests to authenticate logon requests from your PC.