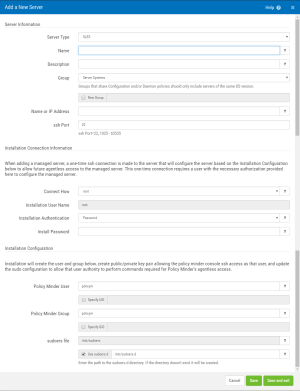
Add a New Server screen
Use this screen to add a new server. When a new managed server is added, Security Auditor makes an ssh connection, creates a group, user and ssh keys, and configures sudo so that the new server can be managed by Security Auditor's agentless control.
How to get there
Choose Servers > Add a Server. Or, from the Manage Servers screen, click Add.
Server Information
Server Type
Here, choose the OS of the server you are adding.
Name
This is the name of the server as it will appear in Security Auditor.
Name variables:
- {nameoripaddress}
- {servertype}
- {hostname}
Description
A description of the server can be added here.
Description Variables:
- {name}
- {nameoripaddress}
- {servertype}
- {hostname}
Group • New Group
Choose a group from this drop-down list to assign the server to one of Security Auditor's Groups. Check New Group and type the name of the new Group in the adjacent text box to add a new one. Organizing servers into Groups can help you more easily view and manage servers as you work with policies and compliance. A server can only be assigned to one group.
New Group shares policy
Check this box if the servers in the Group should have a Shared Policy. If this option is not checked, a Shared Policy will not be available for this Group. See Policy Overview for more details.
Name or IP Address
The name of the server or its IP address.
Name or IP Variables:
- {name}
ssh Port
The ssh port. The default is port 22 for Unix-based servers.
Installation Information
When a new managed server is added Security Auditor will make an ssh connection, create a group, user and ssh keys and configure sudo so that the new server can be managed by Security Auditor's agentless control.
Connect How
If root is selected then install will be performed as root. If Use SU is selected then before installation begins the install program will log on using the user and password given and then su to root with the password given. If sudo is selected then install will be performed as a user who can execute admin commands using sudo (with their own password).
Connection Option (Windows only)
If Default User and Password is selected, installation will use the shared ID. If Server User and Password is selected, an ID specific to this server will be used. The Default User and Password is specified in Security Auditor's Preferences screen.
The following settings apply to non-Windows servers only:
Installation User Name
If "root" is selected for Connect How, "root" appears here. Choose "su" or "sudo" for Connect How to enter the name you would like to use for product installation on the server.
Installation Authentication
The authentication method must be specified for the Installation User.
- Password If this option is selected, you must provide the password required for the Installation User.
- Private key If this option is selected, you must paste or type the contents of a private key file (.pem).
- Private key .pem file If this option is selected, you must select a .pem file from the file system.
- Managed Private Key If this option is selected you must select a Private Key defined under the 'Admin Tasks' menu.
Install Password
Password is used only for install and is not saved. If the console is not configured for https (see manual) then the password will be sent clear text one time from browser to server.
Security Auditor User • Specify UID
A user with this name will be created on the managed server and used by Security Auditor for agentless control.
Security Auditor Group • Specify GID
A group with this name will be created on the managed server and used by Security Auditor for agentless control.
sudoers file • Use sudoers d
Enter the path to the sudoers file where sudo config is located. If 'Use sudoers.d' is checked then the necessary sudoers additions for the Security Auditor user to execute commands via sudo will be placed in a new file in the sudoers.d directory (this is a best practice). If unchecked then the necessary changes will be appended to the sudoers file.
Cancel • Save • Save and Exit
Click Save to add the server without dismissing the Add a New Server screen. Click Cancel to dismiss this screen without making changes. Click Save and exit to add the server and dismiss the screen.

