Policy Overview
Group Policies and Private Policies
Security Auditor can check for compliance of many servers against a common Group Policy, or check for compliance of individual servers against their own Private Policies.
Each server can be checked against a Private Policy, a Group Policy, or both. For example, a Group Policy can be used for general settings that should be the same for all servers in the Group, then Private Policies can be defined for individual servers within the Group with more specific compliance standards that do not apply to other servers in the Group.
Group Policies
A Group Policy is a policy intended for comparison against all servers in a Server Group. Compliance with a Group Policy can be checked for individual servers in a Group, or for all servers in the Group at once.
User Accounts, Files, and Scripts policy categories can be added and defined manually. Configuration, Exported Directories, and Daemons categories must be initialized for a server first. The initialization settings for that server become the compliance standard for the Group Policy.
To create a Group Policy for the User Accounts, Files, or Scripts Categories
- Add servers to the desired Server Group (as they are added to Security Auditor).
-
Choose Servers and Policies > Server Group or Servers and Policies > Server. The Servers and Policies screen appears.
- For Policy, choose Group.
- Select the desired category (e.g. User Accounts).
- Click New. You are prompted to define a Policy Template. See User Accounts, Daemons, and Scripts for details on defining Policies in these categories.
See To Initialize Group Policies below for information on creating Group Policies for Configuration, Exported Directories, and Daemons categories.
Private Policies
A Private Policy is a policy intended for a single server. While servers with Private Policies can be grouped together, and checked as a group, their compliance status is always a reflection of a comparison with their Private Policy.
To create a Private Policy for the User Accounts, Files, or Scripts Categories
- Add the server to Security Auditor. It can be assigned to any Group, or the Default Group.
-
Choose Servers and Policies > Server. The Servers and Policies screen appears.
- For Policy, choose Private.
- Select the desired category (e.g. User Accounts).
- Click New. You are prompted to define a Policy Template. See User Accounts, Daemons, and Scripts for details on defining Policies in these categories.
See To Initialize Private Policies below for information on creating Private Policies for Configuration, Exported Directories, and Daemons categories.
Initializing Policies
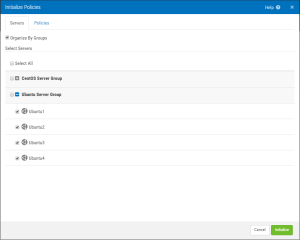
One quick way to get started using Security Auditor is to initialize your policies. When you initialize a category, Security Auditor retrieves the current settings for the category (or categories - Configuration, Exported Directories, and/or Scripts), and establishes that as the baseline policy for that category. The Private Policies for any number of servers can be initialized at the same time.
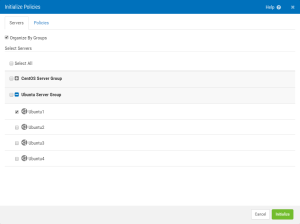
When you initialize a category for a Group Policy, on the other hand, Security Auditor retrieves the current settings for a single server, and establishes that as the baseline policy for that category for all servers in the Group.
To Initialize Private Policies for One or More Servers
- Click on Console Tasks > Initialize Policies. The Initialize Policies screen appears. On the Servers tab, select one or more servers.
- Click the Policies tab.
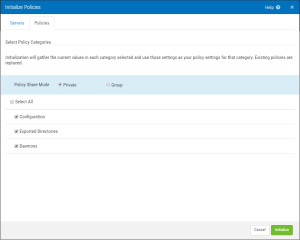
- For Policy Share Mode, choose Private.
- Select the Categories to be initialized.
- Click Initialize.
To Initialize Policies for a Group
- Click on Console Tasks > Initialize Policies. The Initialize Policies screen appears. On the Servers tab, select the server whose settings you would like to use for the Policy standard. (Only one Group can be initialized at a time.)
- Click the Policies tab.
- For Policy Share Mode, choose Group.
- Select the Category to be initialized.
- Click Initialize.
Copying Policies to Another Server and using the Export / Import Feature
Once you have defined policies on one of your servers, you can use the export/import function to copy the policies from one server to another. You might want to use this feature when configuring/setting up a server ensuring the settings are the set properly on the new server, to propagate user account policies to all servers to ensure consistent policy compliance, to ensure settings on QA servers are consistent with production, etc.
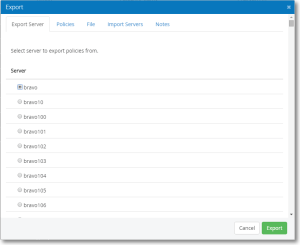
Before you can copy a policy to another server, you must first Export it. Go to Console tasks > Export. You’ll see the following dialog:
Do the following:
- On the Servers tab specify which server you are exporting from (you can only specify one server.)
- On the Policies tab specify whether it is a Private or Group Policy, then select the policies you want to export.
- On the Destinations tab, specify the servers you want to import (or copy) policies to.
Replace Template Options
- By default, policies defined on the target system are over-laid if they also exist on the server to which they are being imported.
- When specifying Replace and a template exists on the target system with the same name as a template on the master system, the master system template will be imported and will have a number added to the end of the name.
Importing Policies
You may want to import a policy file from another console or one that you have acquired elsewhere.
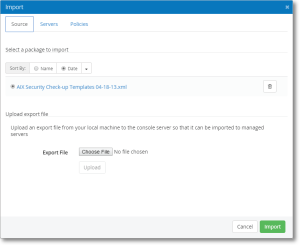
To import a policy file, go to Console tasks > Import:
- For consoles running on Windows you can Browse to find the policy file and upload it.
- For consoles running on AIX or Linux, place the .xml file in the following directory (where Security Auditor was installed).
…/Powertech/SecurityAuditor/tomcat/webapps/securityauditor/exports
(this also works for Windows consoles)
Once you have uploaded the policy file or placed it in the proper directory, it will be listed as one of the files available to be imported. In the example below, the AIX Security Check-up file is available for import.
The next chapters will explain how to define policies and templates as well as what to expect when and using the CheckIt and FixIt functions.


 Previous