Implementing Powertech SIEM Agent
By the end of this section, you will know how to:
- Start SIEM Agent
- Configure Formats
- Configure Outputs
- Configure Events and Event Sources
- Configure Rules
After you have installed Powertech SIEM Agent, use the following instructions to configure the product.
To start Powertech SIEM Agent
Starting SIEM Agent requires the following:
- A valid license key must be installed
- Subsystem QSYSWRK must be active
- TCP/IP must be active
- The user profile under which this runs must have *ALLOBJ special authority or must be a member of the PTADMIN authorization list
Starting Central Administration and SIEM Agent from the command line:
Run the following commands:
PTPLLIB/PPLSTRMON
PTSALIB/PSASTRMON
These commands start the required Central Administration and SIEM Agent monitor jobs in the PTWRKMGT subsystem. See Work Management.
To end these jobs, see Shutting down SIEM Agent.
Accessing the SIEM Agent menus:
Submit command WRKPTSA, or:
- On the command line, enter POWERTECH to open the Powertech Main Menu.
- Choose Option 6. The SIEM Agent Main Menu appears.
Committing Configuration Changes
At any point after changing SIEM Agent's configuration settings, to commit your changes, do the following:
- From the Main Menu, choose option 82, Work with Utilities.
- Select option 1, Commit configuration changes.
Configuring SIEM Agent Formats
A Format holds settings that control the formatting of syslog event data. These Formats are attached to Outputs such that each Output can transmit syslog events in different formats.
To create or change a SIEM Agent Format:
- On the SIEM Agent Main Menu, choose option 2. The Work with Formats panel appears. CEF, JSON, LEEF, MODERN, and SYSLOG Formats are included by default. You can choose option 2 for a Format to edit an existing Formats, or press F6 create a new one. See also Change Format panel and Create Format panel.
NOTE: For more information about SYSLOG formats, see Syslog Header Specifications.
- When you are done defining Formats, press F3 to return to the Main Menu.
Configuring Outputs
An Output Target defines a location to which formatted SIEM events are sent. Each Output Target can specify a different output format.
To create an Output:
- On the SIEM Agent Main Menu, choose option 3.
- Press F6 to create a new Output. The Work with Outputs panel appears.
- Enter a name and description for the Output.
- Set Active to 1 to activate the Output.
- Select a format and type. Press Enter to reveal additional fields that depend on the Type selected. See Create Output panel for complete details.
- *NETWORK: A network location specification. This could be an IP address or DNS-defined name.
- *MSGQ: A message queue.
- *STREAM: A stream file in the IFS.
- *KAFKA: A Kafka server location specification.
- Press Enter to create the Output.
The Output can now be assigned to one or more Event Sources. See Configuring Events and Event Sources.
Configuring Events and Event Sources
IBM i Journals and Message Queues that contain the data retrieved by SIEM Agent 4 are called Event Sources. The records within these Event Sources are called Events. In this section, you will learn how to configure Event Sources in SIEM Agent to identify Events to be extracted, and learn about other options available to you while doing so.
To configure Events and Event Sources:
- On the SIEM Agent Main Menu, choose option 1. SIEM Agent includes five existing Event Sources, one for each Event Source Type. See Work with Event Sources panel for descriptions of the Event Source Types.
- Enter 9 for an Event Source. The Work with Event Descriptions panel appears.
- Use option 6 to activate the events you would like to process. For journal events, also use option 8 to activate the desired subtypes.
- For Journal Events, make any desired changes to Event Fields (option 7) or Subtypes (option 8). See Work with Fields panel and Work with Event Subtypes panel.
- To add or change the Extension or Event Text— the set of formatting patterns used to generate the human-readable form sent to the Output — choose 2 for an Event or Subtype, then press F13 or F14, respectively. See also Extensions and Event Text.NOTE: Event text can be defined by an Event Description, Subtype, or Rule.
- Use option 9 to define Rules for an Event. See Configuring Rules.
- Press Enter.
EXAMPLE: Choose 7 for an event and then 7 for a field to open the Work with Field Substitutions panel where you can translate a field to a human-readable value. A Substitution can be defined by an Event Description, a Subtype, or a Rule. - Enter 2 for an existing Event Source, or press F6 to create a new one. The Change Event Source panel or Create Event Source panel appears, respectively.
- Enter the requested information.
- For Active, enter 1 to activate the Event Source.
- Press F8 to attach an Output. See Work with Attached Outputs panel. You can attach multiple Outputs to the same Event Source.
- Press F6. The Select Output Target panel appears.
- Enter 1 for the desired Output. To define an output, see Configuring Outputs.
- Press Enter. You return to the Work with Attached Outputs panel.
- Press Enter.
Configuring Rules
A relevant piece of data within an event, such as a user profile name, sometimes warrants the inclusion of additional Extensions, an alternative Event Text message, or the need to send the notification to alternative Outputs. SIEM Agent accommodates this need using Rules.
To configure Rules:
- On the SIEM Agent Main Menu, choose option 1. SIEM Agent includes five existing Event Sources, one for each Event Source Type. See Work with Event Sources panel for descriptions of the Event Source Types.
- Enter 9 for an Event Source. The Work with Event Descriptions panel appears.
- Enter 9 for an Event. When you add a Rule to an Event, it applies to all Event Subtypes. To add a Rule to a specific Event Subtype, choose 8 for the Event, then 9 for the desired Subtype. The Work with Rules panel appears.
- Press F6 to create a new Rule.
- Specify the Sequence, Description, and other available options. See Create Rule panel for details.
- Press Enter. Additional fields appear. When creating a Rule, you are asked to provide the action to take if the Conditions for the Rule succeed, which can be alternative Outputs, additional Extensions (for Subtypes, Extensions in addition to those already defined for the event class), or alternative Event Text. Do one or more of the following:
- Press F8 to open the Work with Attached Outputs panel, where you can specify an Output.
- Press F6 to select an Output Target.
- Enter 1 for a desired target and press Enter.
- If you would like to specify multiple Outputs, press F6 again.
- Press F12 to return to the Create Rule panel.
- Press F13 to open the Work with Extensions panel, where you can specify Extensions.
- Press F6 to open the Create Extensions panel.
- Enter a Name and Value. See also Extensions.
- Press Enter. You return to the Work with Extensions panel.
- Press F6 to create another Extensions, or press F12 to return to the Create Rule panel.
- Press F14 to open the Create Event Text panel, where you can define an Event Text message.
- Enter a Reason and Message. See Event Text.
- Press Enter to return to the Create Rule panel.
- Press F8 to open the Work with Attached Outputs panel, where you can specify an Output.
- Press Enter to return to the Work with Rules panel. SIEM Agent 4 evaluates each Rule by comparing data in the event to a Condition or Conditions attached to the Rule.
- Choose 8 for the Rule you just created. The Work with Rule Conditions panel appears.
- Press F6.
- Enter the Sequence, Link, Field, Operator, and Criteria for the Condition. See Create Rule Condition panel for details.
EXAMPLE:
If you wanted a condition that required, for example the PWUSRN field of the TPW-P Subtype of QAUDJRN to be GDORN, you would enter the following: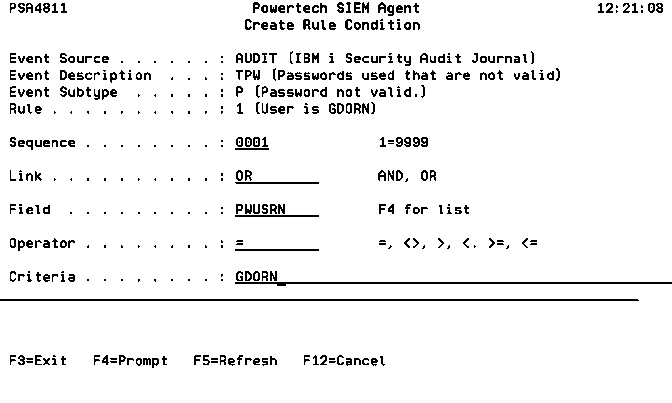
- Press Enter. You return to the Work with Rule Conditions panel.
- Press F6 to add an additional Condition.
-
Press F6 to add an additional Rule. An event can contain multiple Rules, which, like Conditions, are evaluated in sequential order. Or, if you are finished adding Rules, press F12 to return to the previous panel.
When SIEM Agent processes the Event at different levels, Outputs and Event Text are handled differently from Extensions.
When a Rule sets an Output, that Output selection overrides the selection of higher levels. For example, the Output set in a Subtype Rule overrides the standard selection defined at the Event Source (higher level).
When a Rule or a Subtype sets the Event Text, this will replace any Event text defined at higher levels. For instance, an Event Text set at the Subtype level will override that defined in an Event Description Rule (higher), and can in turn be overridden by a Subtype Rule (lower).
In contrast, Extensions are additive. When a Rule or Subtype defines Extensions, the Extensions are added to the Extensions defined at the higher levels. Extensions are then sorted in alphabetical order before the Event is sent to the Output. In the following table, the levels are ordered from highest to lowest.
Level Output Selection Event Text Extensions Event Source Select Output Event Description Set Event Text Add Extension Event Description Rule Override Outputs Override Event Text Add Extension Subtype Override Event Text Add Extension Subtype Rule Override Outputs Override Event Text Add Extension EXAMPLE:
To illustrate the hierarchical nature of Rules, consider you have created a Rule at the TPW Event Description level to forward all TPW events to OUTPUTA. However, all TPW-P events should be forwarded to OUTPUTB instead. To configure this, you would create a Rule for the TPW-P Subtype, and set the Rule Output to OUTPUTB. Now, all TPW events are forwarded to OUTPUTA except TPW-P events, which are forwarded to OUTPUTB.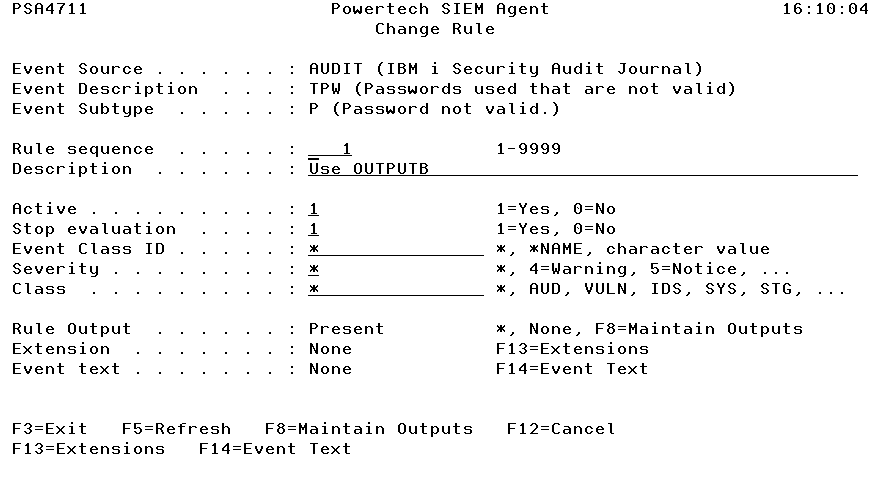
Now, imagine profile TEST is creating many TPW-P events that should be ignored. To omit these extra events, you can create another Rule with Rule Output set to None and a corresponding Condition with PWUSRN = TEST.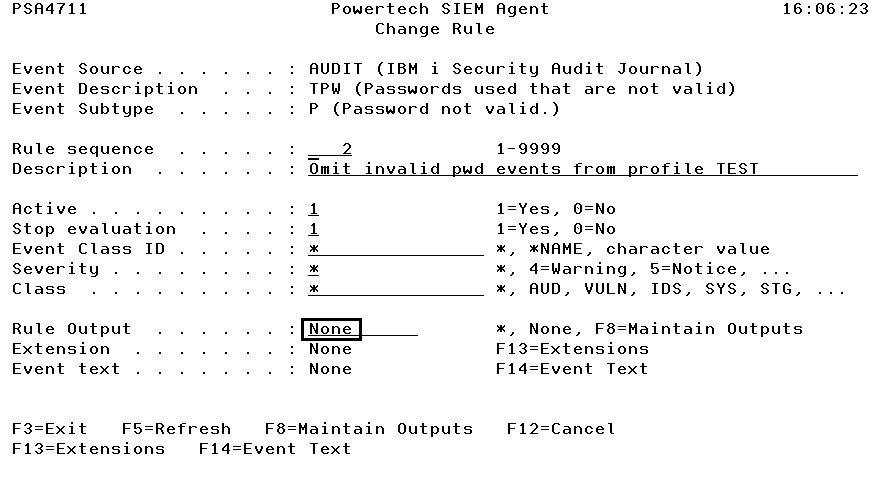
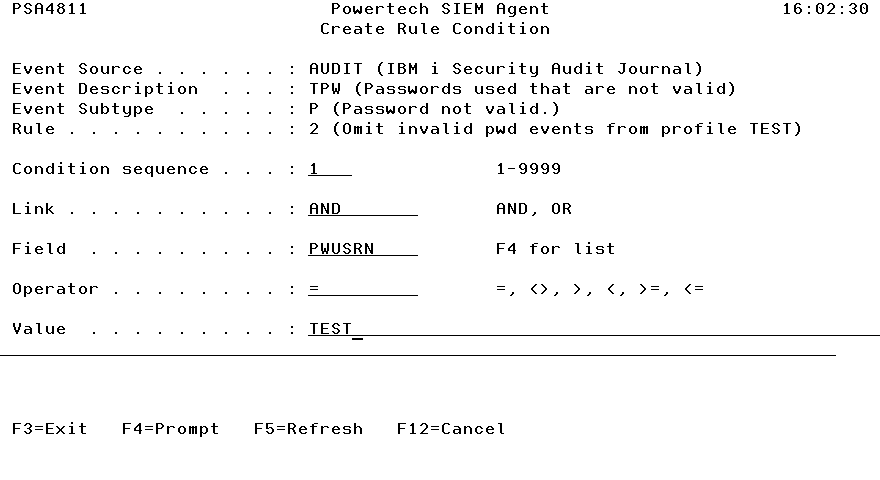
Now, TPW-P events initiated from profile TEST are not forwarded to any output. TPW-P events initiated from profiles other than TEST are forwarded to OUTPUTB.
For example, you could use the OR and EQUALS value to create a set of Conditions in the Rule that compares the PWUSRN field of the event to many user profiles. In this case, if a match is found for any, the Rule succeeds.
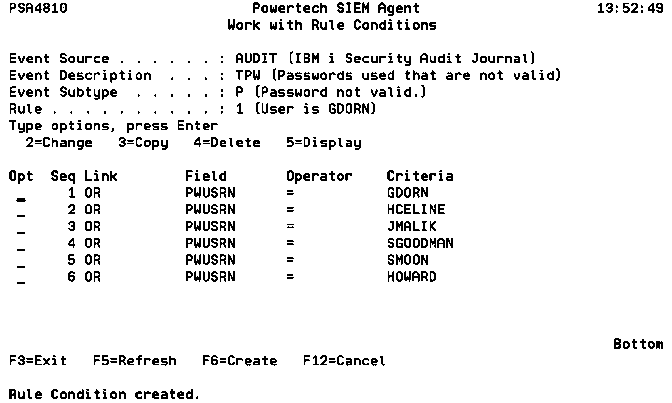
When you have finished adding Conditions, press F12 to return to the Work with Rules panel.
Viewing History with Central Administration
You can use Powertech Central Administration to view a record of SIEM Agent history. To do so:
- From the command line, enter POWERTECH.
- From the Powertech Main Menu, choose option 80, Central Administration.
- Choose option 4, History Menu. Use the options here to view a history of product activity.