Task Builder Ribbon
Overview
The ribbon is a contextual interface designed to increase efficiency and make it easier for users to find features and access popular commands and controls during task construction. The ribbon spans the top of Task Builder, directly below the title bar. It is filled with graphical representations of control elements that are grouped by different functionality. Commands are organized in logical groups, which are collected under operation related tabs. The ribbon brings the most common commands to the forefront, so you no longer have to navigate through menus, sub-menus, and toolbars searching to find what you want.
Enlarging or maximizing the Task Builder window vertically auto-expands the ribbon. To add additional space, you can collapse the ribbon so only the tabs appear. This can be accomplished by clicking Pin/Unpin Ribbon. Because not every single option can fit on the ribbon, drop-down menus are available which are represented by small arrows below certain buttons/commands. Clicking these arrows displays a drop-down menu which contain related sub-commands. For example, if you click the arrow below the Run icon, a drop-down menu appears, displaying related commands such as Run All, Run Selected, Run From Here, and Step (shown below).
Related Topics
.png)
 Tabs
& commands
Tabs
& commands
The Task Builder ribbon is categorized into four contextual tabs: File, Home, Step, and Actions. Each represent an activity area grouped with related commands, controls, or buttons that represents the operation to perform. To view a description of each command and associated hot keys (if any), hover the mouse cursor directly above the desired command. The following tables describe the available commands contained within each tab:
Home tab commands
The following table details each command found in the ribbon Home tab, along with their associated controls and keyboard hot key combinations (if applicable). Each command is categorized by the group they reside in.
| Group | Icon | Command | Description | Hot key |
|---|---|---|---|---|
| --- |

|
Edit | Opens the properties of the selected step for editing. | --- |
| Find |

|
Find | Finds a specific word or phrase within the task. More on Find & Replace. | CTRL + F |
|
|
Find Next | Finds the next instance of a word or phrase. More on Find & Replace. | F11 | |
|
|
Find Previous | Finds the previous instance of a word or phrase. More on Find & Replace. | F12 | |

|
Replace | Replaces an occurrence of the selected text string. More on Find & Replace. | CTRL + H | |
|
|
Replace Next | Replaces the next occurrence of the selected text string. More on Find & Replace. | CTRL + SHIFT +R | |

|
Select/Select All | Selects all steps in the Steps panel. | CTRL + A | |
|
|
Select Step Number | Opens a dialog, allowing entry of the desired step to select. Mainly used to navigate to a specific step within a task that includes a significantly large amount of steps. | CTRL + G | |
|
|
Select Label | Opens a dialog, allowing entry of the desired label to go to. Used to jump to another section of the task defined by a Label. | CTRL + L | |
| Debug |

|
Run | Runs the steps of the current task, sequentially. More on run options. | F5 |

|
Run Selected | Runs the selected steps. More on run options. | CTRL + F5 | |

|
Run from Here | Runs all steps from the specified step onward. More on run options. | SHIFT + CTRL + F5 | |

|
Step | Runs the task one step at a time starting from the highlighted step. Click each time you want to run the next step. More on run options. | CTRL + F2 | |
|
|
Continue | Continues execution of a paused task from the point of suspension until its completion, or until an error is encountered, a breakpoint is reached, or Pause is manually clicked. | F5 | |

|
Pause | Pauses a running task. More on run options. | F6 | |

|
Stop | Stops and resets a running task. More on run options. | CTRL + F2 | |
| Insert |

|
Attachment | Adds an attachment to the highlighted section of the Steps pane. More on Attachments. | --- |

|
Variable | Adds a variable to the highlighted section of the Steps pane. More on Variables. | CTRL + ALT + V | |

|
Comment | Adds a comment to the highlighted section of the Steps pane. More on Comments. | CTRL + ALT + C | |
| View |

|
Visual Mode | The steps of the task are displayed in Visual Mode, which displays a plain English text description of each step. More on editing task steps. | --- |

|
AML Mode | The steps of the task are displayed in AML (Automation Markup Language) mode, the internal language used by Automate Desktop. More on editing task steps. | --- | |
| Recorder |
|
New Recording | Opens the Automate Desktop Recorder – a powerful feature that simplifies the process of automating and recording user interface interactions and actions in Automate Desktop. By using the intuitive interface, you can quickly and easily create and add recordings to new or existing tasks. More on the Recorder. | CTRL + ALT + R |

|
Edit | Edits an existing Recorder recording. More on the Recorder. | CTRL+ ALT + E | |

|
Split | Splits a recording into two recordings at the specified step. More on the Recorder. | CTRL + ALT + T |
Step tab commands
.png)
The following table details each command found in the ribbon Steps tab, along with their associated controls and keyboard hot key combinations (if applicable). Each command is categorized by the group they reside in.
| Group | Icon | Command | Description | |
|---|---|---|---|---|
| Step |
|
Up Arrow | Moves the selected steps up one line. To select multiple steps, hold down Ctrl on your keyboard during selection. More on editing task steps. | CTRL + UP |
|
|
Down Arrow | Moves the selected steps down one line. To select multiple steps, hold down Ctrl on your keyboard during selection. More on editing task steps. | CTRL + DOWN | |
|
|
Left Arrow | Decreases indentation of the selected steps. To select multiple steps, hold down Ctrl on your keyboard during selection. More on editing task steps. | CTRL + LEFT | |
|
|
Right Arrow | Increases indentation of the selected steps. To select multiple steps, hold down Ctrl on your keyboard during selection. More on editing task steps. | CTRL + RIGHT | |

|
Create Region | Creates a region. More on Regions. | CTRL + R | |
|
|
Encapsulate in Region | Encapsulates selected steps into a region. More on Regions. | CTRL + E | |
|
|
Rename Region | Renames the selected region. More on Regions. | --- | |
|
|
Clear Region | Clears the selected region. More on Regions. | --- | |
|
|
Clear All Regions | Clears all regions. More on Regions. | --- | |
|
|
Expand All Regions | Expands all regions. More on Regions. | CTRL + SHIFT + E | |
|
|
Collapse All Regions | Collapses all regions. More on Regions. | CTRL + SHIFT + C | |

|
Reset Indent | Removes indentation from a step. More on editing task steps. | --- | |

|
Add Label | Adds a label to the highlighted section of the Steps pane. More on Labels. | --- | |

|
Disable | Enables/Disables execution of the selected steps. To select multiple steps, hold down Ctrl on your keyboard during selection. Disabled steps appear dimmed and are ignored during task execution. Newly added steps are enabled by default. | --- | |

|
Bookmark | Adds a bookmark to the selected steps. To add to multiple steps, hold down Ctrl on your keyboard during selection. Bookmarks are a means of marking steps so you can find them easily when constructing or editing a task. More on bookmarks. | CTRL + F3 | |
|
|
Next Bookmark | Goes to the next step that contains a bookmark. More on bookmarks. | F3 | |
|
|
Previous Bookmark | Goes to the previous step that contains a bookmark. More on bookmarks. | SHIFT + F3 | |
|
|
Clear All Bookmarks | Clears all bookmarks from all steps. More on bookmarks. | CTRL + SHIFT + F3 | |

|
Breakpoint | Adds a breakpoint to the selected steps. To add a breakpoint to multiple steps, hold down Ctrl on your keyboard during selection. A breakpoint is a debug tool that pauses task execution at the specific step to allow the developer time to examine particular data that may change during the course of the task (for example, variables or datasets). More on Breakpoints. | F8 | |
| Clipboard |

|
Paste | Pastes the previously copied or cut steps. The steps are pasted directly below the currently highlighted line in the Steps pane. More on copying & reusing task steps. | CTRL + V |

|
Cut | Cuts the selected steps. To select multiple steps, hold down Ctrl on your keyboard during selection. To select all steps, press Ctrl + A on your keyboard or click from the Find group. More on copying & reusing task steps. | CTRL + X | |

|
Copy | Copies the selected steps to the clipboard. To select multiple steps, hold down Ctrl on your keyboard during selection. More on copying & reusing task steps. | CTRL + C | |
|
|
Copy Description | Copies the text description of the selected steps. The description can be pasted into another document, such as Notepad. To select multiple steps, hold down Ctrl on your keyboard during selection. More on copying & reusing task steps. | CTRL + D |
Actions tab commands
.png)
The following table details each command found in the ribbon Actions tab, along with their associated controls and keyboard hot key combinations (if applicable). Each command is categorized by the group they reside in.
| Group | Icon | Command | Description |
|---|---|---|---|
| Actions Panel |

|
Add Step | Obtains the action selected from the Available Actions pane and places it as the last step on the Steps pane. More on Steps. |

|
Insert Step | Obtains the action selected from the Available Actions pane and places it in the specified location on the Steps pane. More on Steps. | |

|
Expand All | Expands all folders in the Available Actions pane. More on Available actions Pane. | |

|
Collapse All | Collapses all folders in the Available Actions pane. More on Available Actions Pane. | |

|
Categories | Enables/Disables categorized folders in the Available Actions Toolkit (enabled by default). More on Available actions Pane. | |

|
Sort A to Z | Changes the sort order of the current Available Actions view to alphabetical A to Z. Click again to reverse the sort order. More on Available Actions Pane. | |
| My Actions Panel |
|
Clear Favorites | Clears the My Actions favorite actions list. More on My Actions pane. |
|
|
Clear Recent | Clears the My Actions recent list of actions. More on My Actions pane. | |
|
|
Clear All | Clears all the My Actions Favorites, Snippets, Recent, and Frequent lists. More on My Actions pane. | |
|
|
Clear Snippets | Clears the My Actions snippet action list. More on My Actions pane. | |
|
|
Clear Frequent | Clears the My Actions frequent actions list. More on My Actions pane. | |
|
|
Clear Folder | Clears the selected snippet folder in the My Actions pane. More on My Actions pane. | |
|
|
Add to Favorites | Adds the selected action to the Favorites list. More on My Actions pane. | |
|
|
Add as Snippet | Adds the selected step as a snippet. More on My Actions pane. | |
|
|
Create Folder | Creates a snippets folder. More on My Actions pane. | |
| --- | Remove Selected | Removes the selected step, snippet, or region. More on My Actions pane. |
Layout tab commands
.png)
The following table details each command found in the ribbon Layout tab, along with their associated controls and keyboard hot key combinations (if applicable). Each command is categorized by the group they reside in.
| Group | Icon | Command | Description |
|---|---|---|---|
| Layout |

|
Step numbers | Turns step numbers On/Off as they appear on the Steps pane (on by default). More on editing task steps. |

|
Word Wrap | Turns word wrap On/Off. When set to ON, the text is wrapped in the Steps pane so it does not scroll across the entire screen (on by default). More on editing task steps. | |

|
Panel Layout | Shows/Hides specific Task Builder windows. All windows are shown by default. |
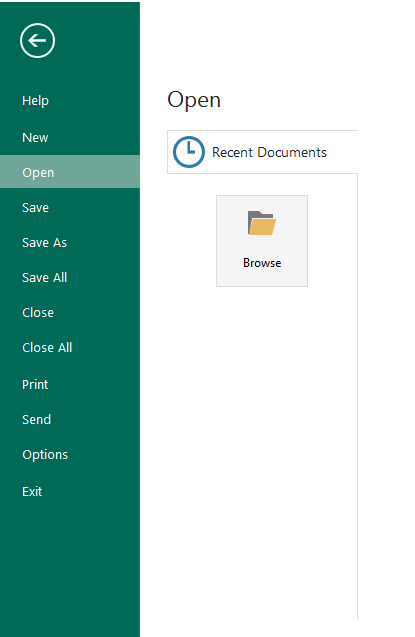
File
tab
The File tab is located in the upper-left corner of the ribbon and presents a menu of commands and operations that do not directly relate to the editing of the task at hand. They include items that normally reside in the File menu of legacy systems, such as New, Open, Save, Print, and Close . The right-hand portion of the menu lists the most recently opened tasks. These are always conveniently visible so that you do not have to search your computer for a task you previously opened or frequently work on. The bottom right corner of the menu contains the Options button. Clicking this button opens a Preferences dialog that supplies an assortment options used to configure visual and behavioral attributes of the Task Builder.
File menu commands
The following table provides a description for each command found when clicking Application, along with their associated controls and keyboard hot keys (if applicable).
| Command | Description | Hot key |
|---|---|---|
| Help | Opens the embedded help files. | --- |
| New | Creates a new task. Selecting this option adds
a new tab in the Steps pane. NOTE: Using this option creates an unmanaged task. |
CTRL + N |
| Open... | Opens an existing task. A standard Windows Explorer dialog is displayed, allowing you to navigate to the task (.AML) file to open. | CTRL + O |
| Save | Saves the current task. If the task being saved is a managed task, it is saved to its present location. If saving an unmanaged task (for example, created using the New option), a standard Windows Explorer dialogis displayed, allowing you to select the folder to save the task (.AML) file. | CTRL + S |
| Save As | Saves a copy of the task file or saves the task file in another format. A standard Windows Explorer dialog is displayed, allowing you to navigate to the location in which to save the task (.AML) file. | SHIFT + CTRL + S |
| Save All | Save all open tasks. | --- |
| Close | Closes the current task file. If changes are made, a dialog is displayed, prompting whether to save the changes. Click Yes to proceed. | --- |
| Close All | Closes all currently opened tasks. If changes are made to one or more tasks, a dialog is displayed, prompting whether to save the changes. Click Yes to proceed. | --- |
| Prints the steps of the current task as they appear in the Steps pane. | --- | |
| Send | Emails the current task to the specified recipient. The available send options are:
|
--- |
| Options | Allows access to available Task Builder Options. The table below lists the available options. | --- |
| Exit | Closes the Task Builder. | --- |
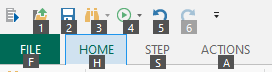
Quick
Access toolbar
The Quick Access toolbar is a small, customizable area in the upper left of the ribbon that provides you with one-click shortcuts to commonly used commands that are independent of the ribbon tabs that are currently displayed. You can add specific commands to the Quick Access Toolbar so they are available no matter which tab you are on. Additionally, you can move the toolbar from one of two possible locations; above or below the ribbon, or you can hide it altogether to save space.
.png)
Quick Access toolbar default commands
By default, the Quick Access toolbar exposes single-click buttons that represent the most often used commands, such as Open, Save, Undo, Redo, and Run. The following table provides a description of those commands:
| Icon | Command | Description | Hot key |
|---|---|---|---|

|
Window | Provides access to windows-based controls. | --- |

|
Open | Opens an existing task. A standard Windows Explorer dialog appears allowing you to navigate to the task (.AML) file to open. | CTRL + O |

|
Save | Saves the current task. If the task is a managed task, it is saved to its present location. If saving an unmanaged task (for example, created using the New option), a standard Windows Explorer dialog is displayed, allowing you to select the folder to save the task (.AML) file. | CTRL + S |

|
Find | Finds a specific word or phrase. Sub-commands are as follows:
|
--- |
|
|
Run | Runs the steps of the current task
sequentially. Sub-commands are as follows:
|
F5 |

|
Undo | Returns to a previous state by undoing the effects of one or more commands. Helpful for undoing mistakes. | CTRL + Z |

|
Redo | Returns back to the state that was previously undone. | CTRL + Y |

|
Customize Quick Access Toolbar | Provides options to add/remove quick access toolbar icons, move the toolbar above or below the ribbon, and show/hide the ribbon. | --- |
To add a command to the Quick Access toolbar
- On the ribbon, click the appropriate tab or group to display the command to add to the Quick Access Toolbar.
- Right-click the command and click Add to Quick Access Toolbar from the shortcut menu.
To remove a command from the Quick Access toolbar
-
Right-click the command you want to remove from the Quick Access Toolbar.
- Click Remove from Quick Access Toolbar from the menu that appears.
To remove a default command from the Quick Access toolbar
-
Click the More Buttons icon (to the right of the toolbar).
-
From the drop-down menu, select the commands you want to omit from the toolbar. The checkmark next to the command disappears indicating that the command is removed.
-
To reinstate the command, follow the above directions and select the command previously omitted.
To display the Quick Access toolbar below the ribbon
-
Click the More Buttons icon (to the right of the toolbar).
-
From the drop-down menu, select the option Show Quick Access Toolbar Below the Ribbon. The toolbar is displayed below the ribbon.
-
To reinstate the toolbar above the ribbon, select Show Quick Access Toolbar Above the Ribbon.
Access
keys
If you prefer to use the keyboard instead of the mouse, the ribbon provides keyboard shortcuts called Access Keys that enable you to quickly perform operations without reaching for the mouse. Access keys provide a quick and convenient way to use a command by pressing a few keystrokes, no matter where you are in the program.
To use the access keys
- Press and release the Alt key on your keyboard. The KeyTips are displayed over each feature that is available in the current view.
- Press the letter, number, or character combination shown in the KeyTip over the feature that you want to use. Depending on which letter/number you press, you might be shown additional KeyTips.
- Continue pressing letters/numbers until you reach the command or option that you want to use.
Other
keyboard navigation options
Another way to use the keyboard to work with the ribbon is to move the focus among the tabs and commands until you find the feature you want to use. The following table lists some ways to move the keyboard focus without using the mouse:
| To Do This... | |
|---|---|
| Select the active tab of the ribbon and activate the access keys. | Alt or F10. Press either of these keys again to move back to the document and cancel the access keys. |
| Move to another tab of the ribbon. | Alt or F10 to select the active tab and Left Arrow or Right Arrow |
| Minimize or restore the ribbon. | Ctrl + F1 |
| Move the focus to each command in the ribbon, forward, or backward. | Alt or F10 and Tab or Shift + Tab |
| Move down, up, left, or right among the items in the ribbon. | Down Arrow , Up Arrow , Left Arrow , or Right Arrow |
| Activate the selected command or control in the ribbon. | Space Bar or Enter |
| Open the selected menu or gallery in the ribbon. | Space Bar or Enter |
Copyright © Fortra, LLC and its group of companies.
All trademarks and registered trademarks are the property of their respective owners.
25.1.1 | 202512150851 | December 2025