The Site Setup wizard appears after you complete the Server Setup wizard; otherwise, in EFT Administrator, click Configuration > Create New Site, or right-click anywhere in the Server's tree, then click Create New Site.
Do one of the following:
To create a PCI DSS HS-enabled Site, refer to Creating a PCI DSS-Enabled Site
To create a standard Site, click Use standard security settings.
Click Next. The Site Setup wizard Welcome page appears.
In the Site Name box, type a name a distinguishing name for the Site. MySite appears by default, but you can change this to anything you want.
In the Listening IP box, select a specific IP address or keep the default of All Incoming.
Click Next. The Site Root Folder page appears.
In the Site root box, click Browse to specify the root folder, or keep the default.
In the Additional options area, select the check boxes as needed:
Select the Create UNIX-style subfolders check box to create Usr, Pub, Bin, and Incoming folders with appropriate permissions under the root folder. This is only necessary if you are trying to mimic a typical default *nix EFT Server setup.
Select the Automatically assign home folders to newly created users to automatically create a user folder under \Site Root\Usr\ when a new user is added.
|
|
Both check boxes are selected by default. |
Click Next. The User Authentication page appears.
In the Authentication type list, click LDAP Authentication.
Click Next. The LDAP Authentication page appears.
In the Server box, type the Server name or IP address.
In the Port box, keep the default port 389 or specify a different port.
In the Base DN box, type the base domain name for the LDAP user database. For example, type:
dc=forest,dc=intranet,dc=gsIn the User Filter box, type the search filter information. See Advanced LDAP Filtering for a detailed explanation of LDAP filtering.
In the Login Attribute box, type a comma-separated list of attributes to retrieve. For example, type:
mail,e-mail,name,cnIn the Authentication mode area, click one of the following binding methods to define how the client is authenticated:
Anonymous
Simple requires a username and password. Note that the username must follow the syntax for the LDAP server that includes the Common Name and the Domain Components of your LDAP server’s distinguished name. For example, the username might be the following:
If you are using SSL, select the Bind Using SSL check box, then in the User list refresh interval list, click the down arrow to select how often you want EFT Server to check the database for new users.
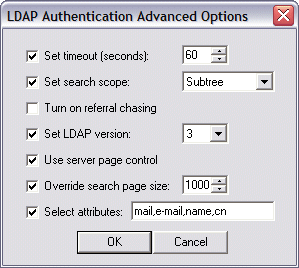
Click Advanced. The LDAP Authentication Advanced Options dialog box appears.

Specify advanced options based on your requirements.
Set timeout - Specify the connection/query timeout (in seconds). This option coupled with paging can help you avoid timeouts when querying against large directories.
Set search scope - This specifies the depth of the level to search for under BaseDN.
BASE - Only the requested object specified in BaseDN is searched.
OneLevel - All of the objects just below this object are searched.
Subtree - Searches for all the objects within the specified BaseDN object recursively.
Turn on referral chasing - If you have referral chasing on, the query returns information for objects that exist in the LDAP structure, but do not actually exist on the EFT Server to which you are connected. The query displays bookmarks to entries that exist elsewhere in the network that EFT Server knows about.
Set LDAP Version - LDAP 2 is widely supported and adds anonymous binding and some filtering. LDAP 3 extends the features of LDAP 2 by adding paging (server side) and more complex filtering.
Use Server Page Control - Asks EFT Server to limit result sets (or pages) to 1000 at a time or the value specified under Override search page size, if checked. If Use server page control is not selected, client-side paging is used to mitigate timeouts when retrieving large directory listings.
Override search page size - Overrides the default page size (1000) for client or server-side page limits. Making the value too large can cause timeouts. Setting the page size too small reduces the overall efficiency.
Select attributes - Returns only the specified attributes for the user objects found as part of the search query. Specifying only necessary attributes will greatly increase the efficiency of your query (since the filtering occurs on the server side).
Click OK to close the LDAP Authentication Advanced Options dialog box.
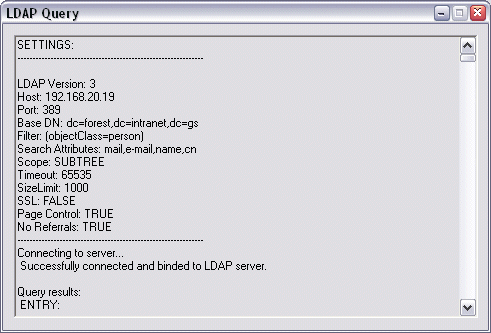
To test your settings, click Test. The LDAP Query dialog box appears.

Click the X in the upper right corner to close the LDAP Query dialog box.
Specify the path at which EFT Server will store additional user settings, if different than the default of C:\Program Files\GlobalSCAPE\EFT\MySite.aud.
In the User list refresh interval box, specify the frequency at which EFT Server's user list should be refreshed.
cn=Manager,dc=forest,dc=intranet,dc=gs
|
|
For details of creating complex LDAP filters, see Advanced LDAP Filtering. |
|
|
The LDAP bind password is encrypted in the FTP.cfg file. |
For details of the LDAP Query dialog box, see Testing LDAP Authentication Settings.
Click Next. The Perimeter Security page appears.
Specify whether to connect the Site to EFT Server's DMZ Gateway.
If you choose to connect to DMZ Gateway, specify its IP address and port, then click Test Connection. If the DMZ Gateway is properly configured, the Test is successful. If the test is not successful, click and I'm not using the DMZ Gateway - or I'll configure it later.
If you have not yet installed or configured DMZ Gateway, click I'm not using the DMZ Gateway - or I'll configure it later.
Click Next. The Connection Protocols page appears.
Select one or more check boxes for the protocol(s) that this Site will use to connect to EFT Server and specify the port number for each protocol:
Click SSL options to define the allowed SSL versions and ciphers or skip this step and leave the defaults.
Click SSL certs to specify the SSL certificate to use for this Site. The SSL Certificate Options page appears.
To create a certificate, click Create certificate and follow the prompts in the wizard. (Refer to Creating Certificates for details, if necessary.)
To use an existing certificate:
In the Certificate box, type the path to the .crt file or click the open icon to find and select it.
In the Private key box, type the path to the .key file or click the open icon to find and select it.
In the Certificate passphrase and Confirm passphrase boxes, type and confirm the passphrase for the certificate pair.
Click Next to return to the Protocols page.
If you choose SFTP, the SFTP options are configured automatically. Optionally, click SFTP options and SFTP keys to configure a different SFTP key pair, encryption algorithms, and MAC algorithms. (All algorithms are selected by default.)
|
|
If you do not enable SSL, you will not be able to connect to EFT Server from a remote EFT Administrator. See SSL Certificate-Based Login, Creating Certificates, Importing a Certificate into the Trusted Certificate Database, and Importing Certificates from Microsoft IIS 5 for information regarding certificates. If you are using Secure Ad Hoc Transfer, you need to configure remote access to EFT Server. |
If you choose AS2 over HTTP/S, click Configure to specify your AS2 identifier and certificate information. The certificate that you specified in step 10 is specified by default. You can keep this default, click the open icons to specify a different certificate pair, or click Create certificate to create a new certificate pair, then click OK.
Click Next. The Site Setup Completed page appears.
You are offered the option of continuing to the User Creation wizard or quitting the Site Setup wizard. Click an option, then click Finish.
If you chose Run New User Creation wizard, the User Creation wizard Welcome page appears.
You can run the Site Setup wizard again at any time to create additional Sites. You can view and modify Site configuration in EFT Administrator.
|
|
After EFT Server connects to the LDAP Server, the users listed in the database appear under the Default Settings node of the User Setting Levels. |