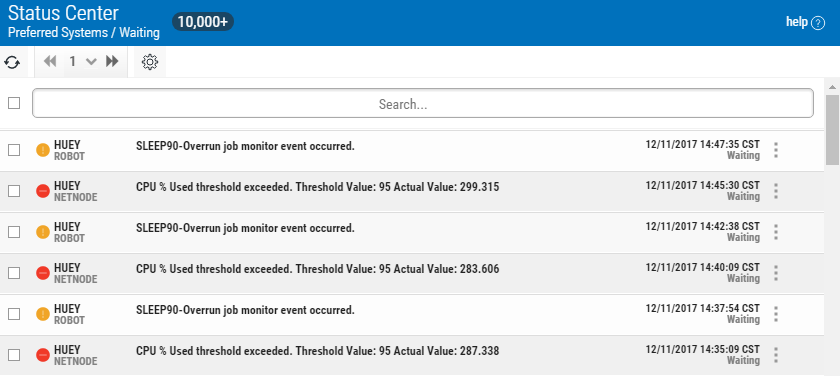
Status Center
Events occur when products perform tasks within the system. Examples of events are Robot Console messages or Robot Schedule jobs ending. Most events are handled by the product involved. When an event cannot be handled at the product level, it's sent to Robot Network for handling. Robot Network creates a status for the event. These statuses are displayed in the Status Center for hosts, nodes, Robot products, and applications.
Viewing the Status Center
In the Navigation Pane, clicktap Status Center under the Robot Network menu. If the menu is hidden, hover over the Navigation Pane to expand it.
Things to know and do:
-
The icon by each status shows you its severity: A red icon
 means Attention, a yellow one
  Warning, and a blue one
  Informational.
 -
The total number of records and groups (if you're grouping statuses) is at the top of the page.
-
The statuses in the list are filtered by whatever you've set under Preferred Systems.
-
Filter the display further, so you only see the statuses you need to.
-
ClickTap the refresh button to refresh the display (or you can set up an auto-refresh).
-
If you're not using auto-refresh, the number of new statuses since you last viewed the page is displayed.
-
ClickTap the page number and select the page you want to view. Or, click the previous and next arrows.
-
Start typing in the Search field to find a specific status. See (below) to learn how to filter your search.
-
Group identical messages so they can be handled together.
-
Change the time zone for status timestamps.
Actions you can take:
ClickTap  Show Actions for a status to see the options available for it. The options will vary depending on the type of status you select. You may see any of the following:
-
Select Properties to view the Status Properties page, including any added notes.
-
Select Performance Details to view the Performance Details page for certain statuses.
-
Select a response (Acknowledge, Reply, Escalate, Assign, Assign to Me) to respond to the status.
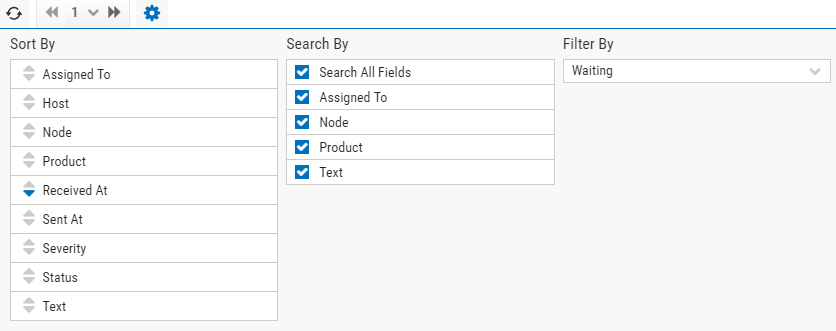
Sorting and Filtering the Display
There are settings for the Status Center page that allow you to choose how to sort the list of statuses, what types of data will be searched when you do a search, and how to filter the list.
-
ClickTap
 Settings.
 -
Select how you want the status list sorted (Sort By). ClickTap your selection again to change the sort order to
 ascending or
  descending.
 -
Select what you want to use when searching for statuses. You can choose to Search All Fields, or to search by Assigned To, Node, Product, or a specific Text string.
-
Select the filtering you want used. You can choose to see All the statuses, or you can select a specific type.
-
ClickTap
Settings to close the settings.