
Managing S3 Bucket Policies
Security Auditor allows you to monitor your AWS S3 bucket settings across many buckets at once using a Shared Bucket Policy, with exceptions to Shared Bucket Policy settings specified for individual Buckets using Private Bucket Policies (For brevity, these are also referred to as simply Shared Policies and Private Policies).
For information on setting up a new AWS account with Security Auditor, see Adding, Monitoring, and Managing Cloud Service Accounts.
Enabling S3 Bucket Policies
- Choose AWS Accounts > Manage AWS Accounts. The Manage AWS Cloud Service Accounts screen appears.
- Click the name of an AWS account to open the Modify AWS Cloud Service Account screen. Or, click Add to add an account.
- Under AWS S3 Policy, check Enable AWS S3 Policy. Here, you can specify whether to allow new or deleted buckets in your policy, and specify a Shared Bucket Policy. Security Auditor includes the *DEFAULT policy, which is configured to match the AWS S3 default settings.
- Click Save.
Managing S3 Bucket Policies
- Choose AWS Accounts > Manage AWS Accounts to open the Manage AWS Cloud Service Accounts screen.
- Click
 for an account. If an AWS S3 policy has been enabled, and Security Auditor finds Buckets in the account,
  appears for the account under the Policy column.
NOTE: The color of the "B" button depends on the status of the Buckets in the account.
appears for the account under the Policy column.
NOTE: The color of the "B" button depends on the status of the Buckets in the account. = Not Checked = Not Compliant
  = Compliant
 - Click to open the Manage Service Buckets screen. This screen lists each bucket in the AWS account, along with its status: Not checked
 , Not Compliant
  , or Compliant
  . Here, you can:
 - Click to run CheckIt to check for compliance.
- Click
 to accept the non-compliant values as part of the Policy. Accepted values are marked with an * (asterisk) in the Bucket Policy Categories screen to indicate they are overridden by a Private Policy.
 - Click
 to enable/disable CheckIt for the Bucket.
- Click
- Click a Bucket Name to open the Bucket Policy Categories screen for that Bucket. This screen lists the Bucket Policy Categories for the account, along with their status: Not checked , Not Compliant , or Compliant . Categories marked with an * (asterisk) are overridden with a Private Policy. Here, you can:
- Click to enable/disable CheckIt for the Bucket.
- Click to accept the non-compliant values as part of the Policy. Accepted values are marked with an * (asterisk) in the Bucket Policy Categories screen to indicate they are overridden by a Private Policy.
- Click to run CheckIt to check the Category for compliance.
- Click
 to revert back to the Shared Policy.
- Click
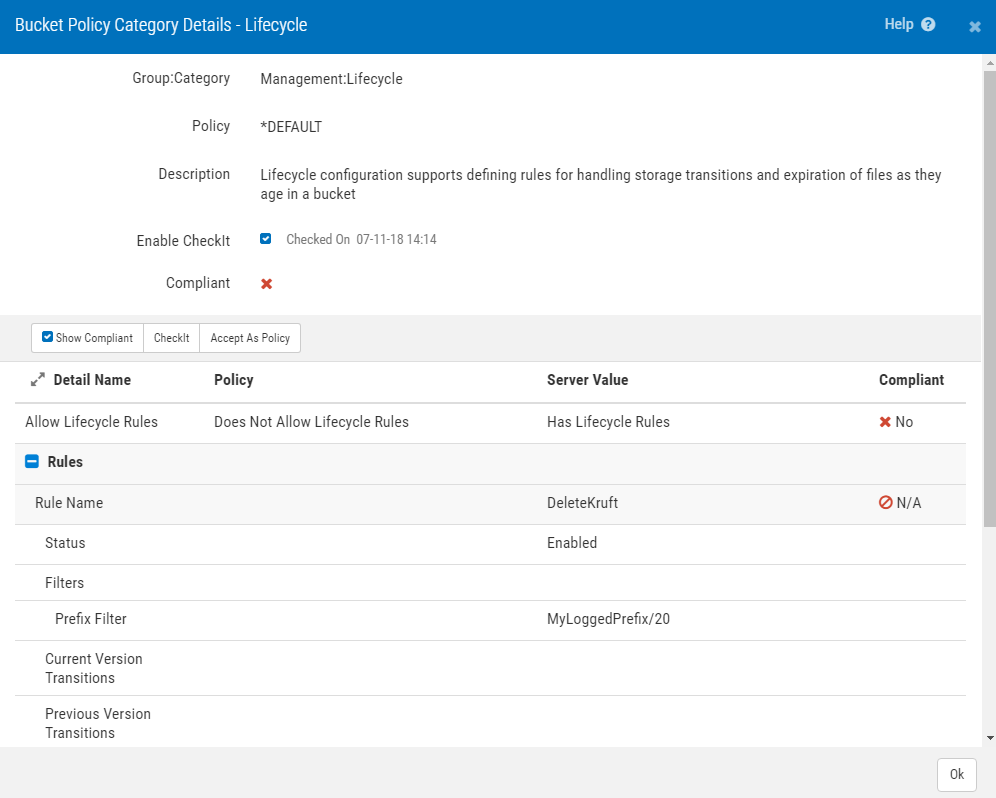
- Click a non-compliant Category to open the Bucket Policy Category Details screen where you can identify more details about the non-compliant values. In the following example, the policy does not allow Lifecycle Rules, but the server has Lifecycle Rules.
- You can click
 to expand the details list, which shows the specific non-compliant server values.
 Previous