
Adding, Monitoring, and Managing Cloud Services
Security Auditor can check Security Policies on server instances of the Amazon Web Services (AWS) EC2 cloud service. These servers can be added individually or en masse just like servers on your local network, as described in Adding Servers to Manage. However, businesses often start new EC2 instances regularly, and manually adding a new Managed Server in Security Auditor for each new server instance can be time consuming.
Fortunately, Security Auditor can monitor your cloud service and use filters to automatically discover new server instances and map them to new Managed Servers, where they can be checked against an existing Group Policy. This process, called polling, allows Security Auditor to respond to deployment of new cloud server instances without any intervention from an administrator. (Servers that have been deleted from AWS can also be removed from Security Auditor automatically.)
The following instructions describe how to add a new cloud service, and begin monitoring and managing cloud server instances.
Adding a Cloud Service Account
- Choose AWS Accounts > Manage AWS Accounts. The Manage AWS Cloud Service Accounts screen appears.
- Click Add to open the Add AWS Cloud Service Account screen.
- Add the requested information:
- Enter a name (required) and description (optional) for the account.
- The Type of account is currently limited to Amazon Web Services Elastic Compute Cloud.
- Check Enable Discovery Polling if you would like to use filters to automatically discover and add server instances deployed by the service.
- Enter your AWS Access Key ID and Secret Access Key.
NOTE:
Amazon recommends against creating access keys for your AWS account and that you delete any that exist. Instead, create a user in AWS Identity and Access Management (IAM) and choose Programmatic access to create an access key for the user. For more information, see Lock away your AWS account root user access keys in the IAM User Guide.
Credentials for a user with “AmazonEC2ReadOnlyAccess” policy at a minimum are required for accessing instance information in an Amazon AWS Account. The policy can be given to the user through Group membership, or it can be directly assigned to the user. There is also a “SecurityAudit” policy that includes “AmazonEC2ReadOnlyAccess” that can be used as a helpful alternative for users that have additional auditing requirements.
- Click Save.
Defining and Validating Filters
In order to monitor for server instances, Security Auditor requires information about your cloud service account, which servers it should discover, and in which Groups the discovered servers' Managed Server definitions belong. Use the following general steps to configure Security Auditor's filters.
- Choose AWS Accounts > Manage AWS Accounts. The Manage AWS Cloud Service Accounts screen appears.
- Click
 (Edit Filters) for an existing cloud service account. The Manage Filters screen appears.
 - Click New to create a new filter definition. Note that multiple filters can be defined for the same cloud service account.
- Enter a name and description for the filter.
- Check the Instance Filters fields you wish to use and specify text and/or variables in those fields to indicate the server instances to discover. See Add Filter screen for more details regarding these fields.
NOTE: You can use the
 icons adjacent to the entry fields to identify the available variables.
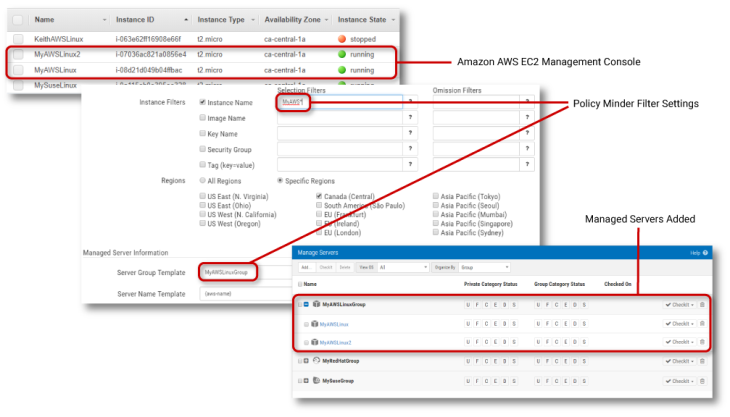
- For Regions, choose All Regions to search your AWS account for server instances in all regions. Choose Specific Regions to identify the regions to be searched. Choose the minimum number of required regions for optimal performance.
- Enter the Managed Server Information. See Managed Server Information for a list of the available variables.
- For Server Group Template, specify the Server Group discovered servers will be assigned to. All server instances discovered by this filter will be placed into one or more Groups. Servers that share a policy should be assigned to the same Group. Remember that only servers of the same Linux distribution can exist in any one Group. See Manage Servers screen for more details on Server Groups.
- For Server Name Template, specify how Security Auditor should name discovered server instances. Each server name must be unique.
- For Server Description Template, specify how the discovered server instances should be described.
- For Server IP Address/Name, specify whether you want to use a public or private IP address/DNS name.
- Enter the Installation Connection Information and Installation Configuration. See Installation Connection Information and Installation Configuration.NOTE:
For Authenticate With, you can choose a Managed Key. See Manage Private Key screen for details.
- Click Save to save your filter settings. You return to the Manage Filters screen.
- Click
 (Validate Filter) next to the filter you have just defined to run the Filter. The results appear in the Validate Filter screen.
 - Click Accept to accept the results and begin polling (if polling is enabled). The Validate Filter button changes to View Filter
 . You can click this button to view the Validate Filter screen with the list of server instances.
Click Managed Servers to return to the Managed Servers screen where you can review your servers and policies. Roll over a server instance with your mouse cursor to view more details.

 Previous