Task Administrator Main Panel
Overview
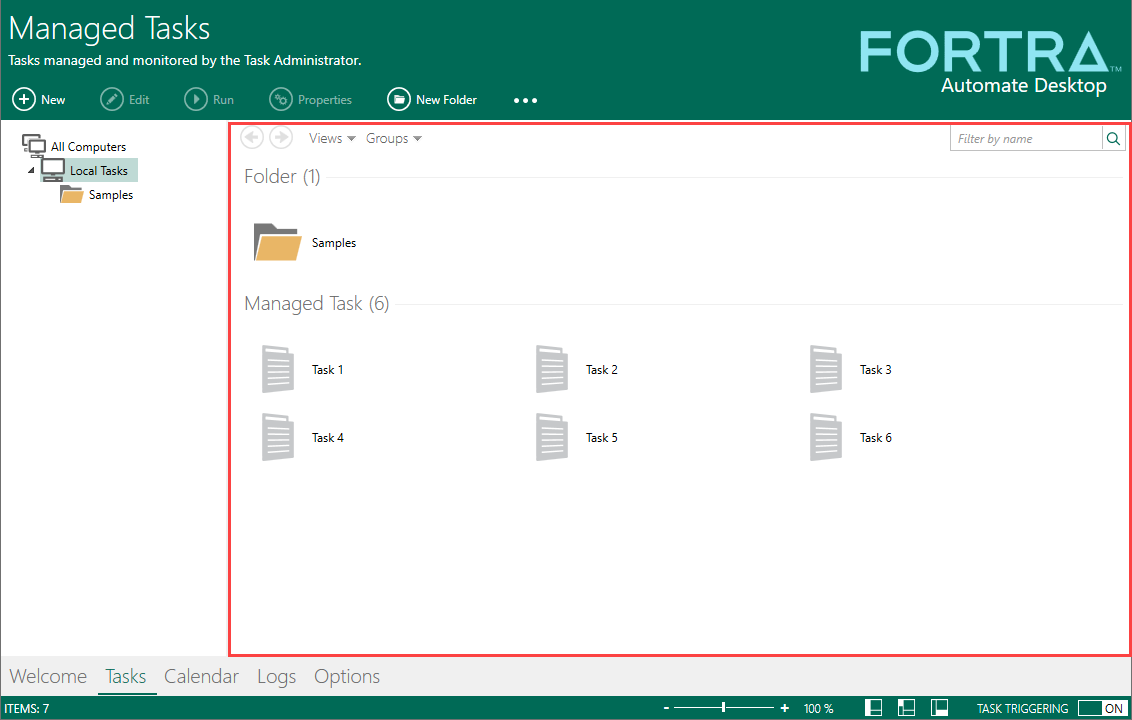
The Task Administrator's main panel is the central workspace where relevant information is displayed and a majority of operations are performed. When a specific view is selected from the Navigation bar, this panel becomes populated with the features and contents corresponding to that view. The main panel's design enables you to view certain aspects of a folder or task without having to drill down to its properties. For instance, you can easily view key information about a particular task (for example, previous/next launch date, latest execution result) by displaying the Information bar (shown below) or switching the layout view to Details. You can also determine aspects by way of the icons associated to each task. For example, if a task is disabled, its associated icon will appear grayed out. If a task failed at its previous execution, the icon will appear red. If a task incudes one or more triggers, its icon is altered to contain an image associated with that trigger or a special image specifying multiple triggers.
Related Topics
 Available
controls
Available
controls
The table below describes various features and controls that can be found in Task Administrator's main panel:
| Feature/Control | Description |
|---|---|
| Back / Forward | Use the Back button to go back to the last location or search results you were viewing, and the Forward button to return to the next location or search results. |
| Views | Dictates how managed tasks and folders
should be displayed. Use views to switch to the type of view
that best fits your needs. The available options are:
|
|
Groups |
Enables managed tasks and folders to be
sequenced in related sets of groups. Use groups to make navigating
large lists easier by grouping items alphabetically, by name,
type, result and other logical grouping. The available options
are:
|
| Search Filter | Defines search criteria to provide better control over which tasks to display. Enter a word or phrase in the search box to look for an item in the current folder. The search begins as soon as you begin typing—so if you enter "B," for example, all the files with names starting with the letter B will appear in the file list. |
| Information Bar | Displays common properties and execution details associated with the selected task, such as the task name, last execution result, last launch date and next launch date. If a folder is selected, the Information bar will display the number of items contained in that folder. To toggle the Information Bar on or off, go to Views > Toggle Information Panel. |
| Column headings | In Details view, you can use the column headings to change how the tasks in the task list are organized. For example, you can tap or click the Last Run heading to sort by execution date (with the task that ran most recently at the top). If you tap or click the column heading again, the tasks are sorted with the oldest ones at the top. Click the down arrow to the right of a column heading or right-click a column heading to select other columns to add. |
Shortcut
menus
When working with objects that appear in the Task Administrator's main panel, shortcut menus (or right-click menus) can be opened by way of user interaction that target a specific object (for example, folder or task) or a region of the workspace that contains no objects. The options and commands that appear in the shortcut menu vary depending on whether a right-click action is being performed on an empty part of the interface, on a specific folder or a specific task. The following tables will describe the available commands.
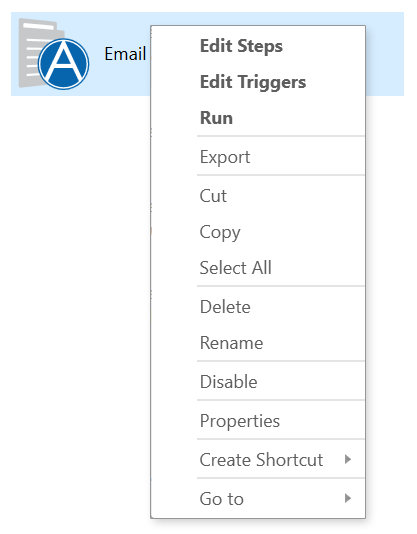
Shortcut menu - Task
Right-clicking on a task displays a shortcut menu with the following items. Note that some items may be irrelevant when a right-click is performed on multiple items.
Menu items
The following table describes the available menu items for tasks:
| Menu Item | Description | Hot Key |
|---|---|---|
| Edit Steps | Opens the Task Builder to enable modification of task steps. | --- |
| Edit Triggers | Opens the trigger properties of the task in order to add new triggers, modify or remove existing triggers. For more details, see Triggers. | --- |
| Run | Immediately
executes the specified tasks. This allows a user to manually
run a task at any point in time. To select more than one task,
hold down CTRL during selection. NOTE: Execution
behavior may depend on certain managed task properties as
well, such as Logon
and Priority properties. |
--- |
| Export | Exports the selected tasks. To select more than one task, hold down CTRL during selection. This operation differs slightly depending whether a single task or multiple tasks are being exported. For more details, see Exporting Tasks. | --- |
| Cut | Removes the selected objects from the current location of the main panel and copies it to the clipboard. The data in the clipboard can later be inserted in the position where the Paste command is issued. To select more than one object, hold down CTRL during selection. | CTRL + X |
| Copy | Creates a duplicate of the selected objects and places the data in a clipboard. The data in the clipboard can later be inserted in the position where the Paste command is issued. | CTRL + C |
| Select All | Selects all objects that appear in the main panel. | CTRL + A |
| Delete | Removes the selected items from the main panel. To select more than one item, hold down CTRL during selection. Deleting a folder will delete all subfolders and tasks contained in that folder. By default, deleting a task will display a message dialog prompting whether to delete the associated task (.AML) file. | DEL |
| Rename | Renames the task or folder currently selected. This menu item is omitted if more than one object is selected. | --- |
| Disable/Enable |
Disables any triggers attached to the selected tasks or enables currently disabled triggers. NOTE: A disabled
task (which are grayed out by default) cannot run automatically,
however, they can still be run manually. To run one or more
tasks manually, from the Task Administrator's main panel,
select the desired tasks and click the Run
button located on the top panel or simply right-clicking the
tasks and select Run
|
--- |
| Properties | Displays the task's properties. This menu item is inactive when a right-click is performed on multiple tasks. | --- |
| Create Shortcut | Creates
a shortcut (.lnk) of the selected tasks in the specified
location. This enables a task to run manually outside of Task
Administrator. To select multiple tasks, hold down CTRL during
selection. The available options are:
|
--- |
| Go to | Enables
quick navigation to the properties of the managed task. This
menu item is inactive when a right-click is performed on multiple
tasks. This menu item does not apply to multiple tasks. The
available options are:
|
--- |
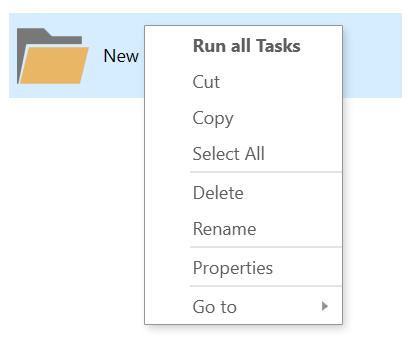
Shortcut menu - Folder
Right-clicking on a folder displays a shortcut menu with the following items. Note that some items may be irrelevant when a right-click is performed on multiple items.
Menu items
The following table describes the available menu items for folders:
| Menu Item | Description | Hot Key |
|---|---|---|
| Run all tasks | Runs all of the tasks contained in the specified folder. As a precautionary measure, a prompt will open to confirm this action and allowing you to select whether to enable execution of tasks contained in subfolders (disabled by default). Note that this option does not support selection of multiple "parent" folders. | --- |
| Cut | Removes the selected objects from its current location and copies it to the clipboard. The data in the clipboard can later be inserted in the position where the Paste command is issued. To select more than one folder, hold down CTRL during selection. | --- |
| Copy | Creates a duplicate of the selected objects and places them in a clipboard. The clipboard items can later be inserted in the folder or position where the Paste command is issued. | --- |
| Paste | Inserts clipboard items into the specified folder. | --- |
| Select All | Selects all objects that appear in the main panel. | CTRL + X |
| Delete | Removes the selected folders from the main panel. To select more than one object, hold down CTRL during selection. Deleting a folder will delete all subfolders and tasks contained in that folder. By default, deleting a task will display a message dialog prompting whether to delete the associated task (.AML) file. | CTRL + C |
| Rename | Renames the folder currently selected. This menu item is omitted if more than one folder is selected. | --- |
| Properties | Displays detailed information about the selected folder. This menu item is inactive when a right-click is performed on multiple folders. | CTRL + A |
| Go to | Displays
the following details about the folder:
|
--- |
Shortcut menu - Empty region
Performing a right mouse click on an empty region in the main panel displays a shortcut menu with the following items.
![]()
Menu items
The following table describes the available menu items that appear when right-clicking an empty region in the main panel:
| Menu Item | Description | Hot Key |
|---|---|---|
| New | Creates
a new object. The available options are:
|
--- |
| Import | Imports the specified task (.AML) files into the Task Administrator. For more details, see Importing Tasks. | --- |
| View | Specifies
how items in the managed tasks library are to be viewed when
they are displayed in the main panel. The available options
are:
|
--- |
| Group by | Sequences
items that are displayed in the main panel by way of a specific
attribute. The available options are:
NOTE: Results are displayed only if the View
parameter is set to Details
and the Show in groups
option is enabled (checked). |
--- |
| Refresh | Brings task status and results up to date. Use this option when running multiple tasks concurrently in order to view the most current event based information that is generated by Task Administrator when set to the view is set to Details. | --- |
| Paste | Pastes the objects previously placed in the clipboard. This menu item is available only if there are objects in the clipboard at the time the right-click action is performed. | CTRL + V |
| Select all | Selects all objects that appear in the main panel. | CTRL + A |
Copyright © Fortra, LLC and its group of companies.
All trademarks and registered trademarks are the property of their respective owners.
24.2.0 | 202409100515 | September 2024