Add Managed Task Wizard
Overview
The Add Managed Task Wizard is designed to simplify task creation by guiding you through the fundamental steps of creating an Automate Desktop task. This includes producing and naming the new task, attaching one or more triggers required to run the task automatically, constructing the steps that sequentially perform the work, and configuring optional error handling, logon and user related properties.
To create a task using the Add Managed Task Wizard
-
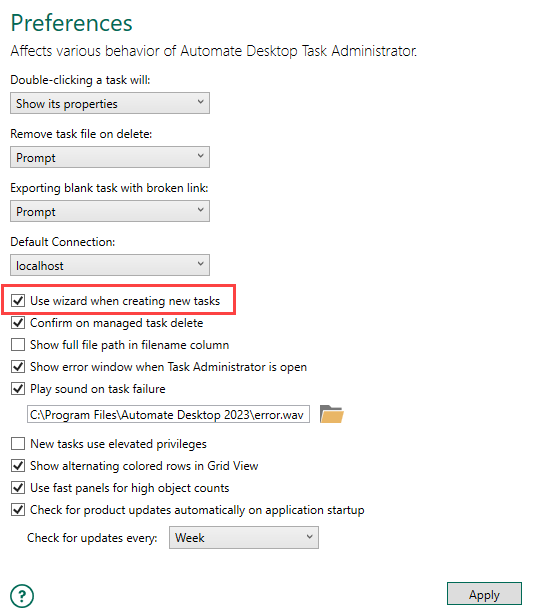
First, confirm that the Add Managed Task Wizard is enabled. From Task Administrator, navigate to Options > Preferences.
-
Make sure Use wizard when creating new tasks is enabled, and then click Apply to save changes.

-
Select Tasks from the Navigation bar.
-
Select which Automate Desktop client you wish to create a new task on. Automate Desktop supports creation of tasks that reside on a remote client (or Runtime), however, there are limitations. For more details, see Managing Remote Tasks.
-
Select the folder you wish to create the new task in. To create a new folder, see Organizing Tasks & Folders.
-
Click the New button located on the Top panel or right-click an empty space inside the folder, and then select New > Managed Task. The Add Managed Task Wizard dialog appears.
Add Managed Task Wizard
For easy navigation, the top portion of the Add Managed Task Wizard displays the flow of available steps which are selectable in case you need to jump directly to a particular step. In addition, you can use the Forward or Back buttons to move up or down one step. For easy verification, information about the managed task, such as its properties and attached triggers (if any) are displayed upon completion.
-
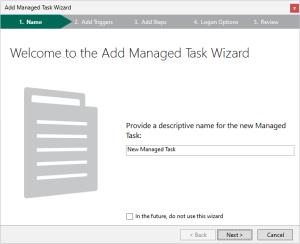
Welcome
The Add Managed Task Wizard opens with the Welcome screen. The flow of steps are displayed on the top portion with the current step being highlighted for easy navigation. Enter a unique name for the task in the provided text-box. If you are more experienced with the task creation process, you may opt out of using the wizard. See Creating a task without the Wizard for more details. To disable the Add Managed Task Wizard in the future, add a check to the option In the future, do not use this wizard. Click Next to proceed to the next step.
-
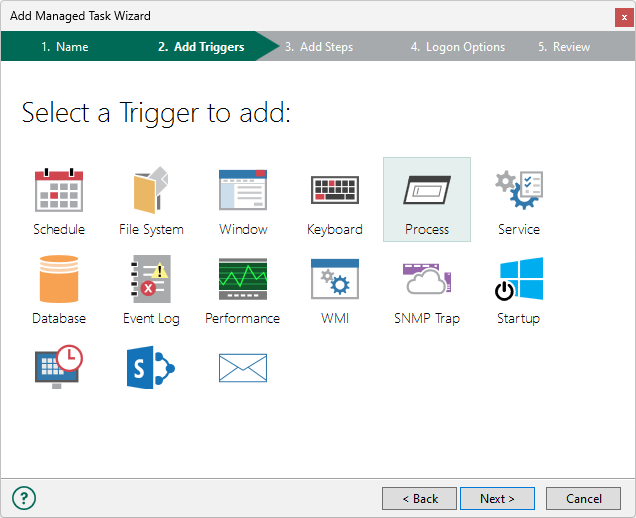
Add Triggers
The next step allows you to add one or more triggers to the task. Triggers are objects that allow tasks to run automatically by watching for specified system events or conditions to occur and "triggering" task execution as a result. To display a brief description regarding a specific trigger, single-click the associated icon. To select a specific trigger, double-click the associated icon. Upon selection, the properties of that trigger is displayed. Enter the desired properties and click OK to save the settings and close the properties window. For more details, see Triggers. Upon completion, the screen is then updated with information relating to the newly created trigger. To add an additional trigger, click Add. Otherwise, click Next to proceed.
NOTE: Triggers that are unlicensed will appear opaque. Selecting an unlicensed trigger will generate an error. For more details on licensing individual objects, see License.
-
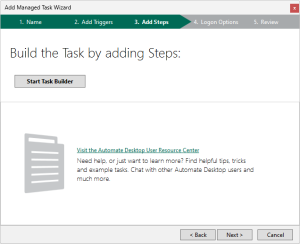
Add Steps
The next step allows you to add steps to your task. Steps, which are comprised of Automate Desktop activities, are the core of a task and define the "work" the task will perform. Click the Start Task Builder button to start adding steps to your task by way of the Task Builder. For more details, see Adding task steps. After creating your task, click the Update and Close button from the Task Builder to save the task and close the Task Builder window. Click Next to proceed.
-
Logon Options
-
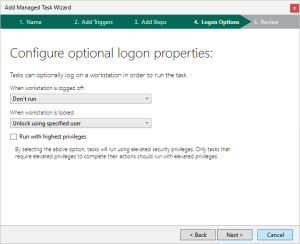
Logon Properties
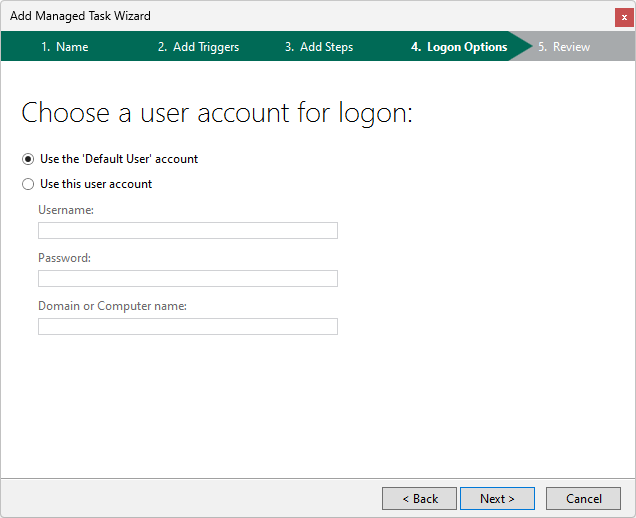
The logon options configuration screen is a two part step. The first part allows you to choose what the task should do in case the workstation is locked or logged off during runtime. For more details regarding logon properties, see Logon Properties. After entering all required settings, click Next to proceed.
-
User Account
The next part enables you to enter a username and password that Automate Desktop will use to logon a logged off computer or unlock a locked computer in the event that the task requires a desktop to run properly. Select the Default User option to instruct Automate Desktop to impersonate the user entered in Options > Default Properties > Default User preferences. For more details, see Default User. To specify a different user account, select Use this user account and enter the username, password and domain/computer name in the provided fields. Click Next to continue.

-
-
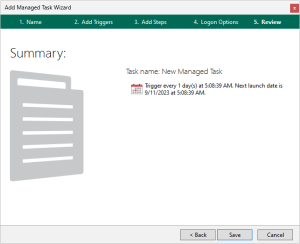
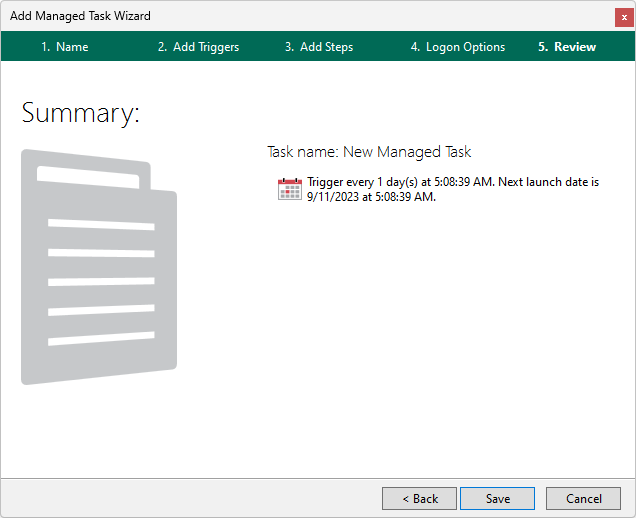
Review
The final screen appears which provides a summary of the newly created task including the task name and information about any added triggers. This signifies the completion of your task creation. However, if you need to modify any preferences, simply click Back until you reach the screen in which to edit. If all is complete, click Save to save all preferences and exit the Add Managed Task Wizard.
A new task icon corresponding to the newly created task will appear in the Task Administrator's main panel. In the future, you can always make changes to the task, add/remove triggers or modify its properties by either double clicking the task icon or by right-clicking it and selecting Properties. For more details about setting task properties, see Managed Task Properties.