![]()
Even if you plan to restore the Server from a backup, you must still create the initial Server object in the administration interface.
After you follow the procedures Installing the Server, Interface, and Modules, the next step is to log in to EFT Server via the Server interface, called the administration interface or AI, and configure the client connections to EFT Server.
When you connect to EFT Server for the first time, you must configure it on the computer on which the EFT Server service is installed. After you have created the local connection and enabled remote connections, you can connect to and administer EFT Server remotely.
|
|
Even if you plan to restore the Server from a backup, you must still create the initial Server object in the administration interface. |
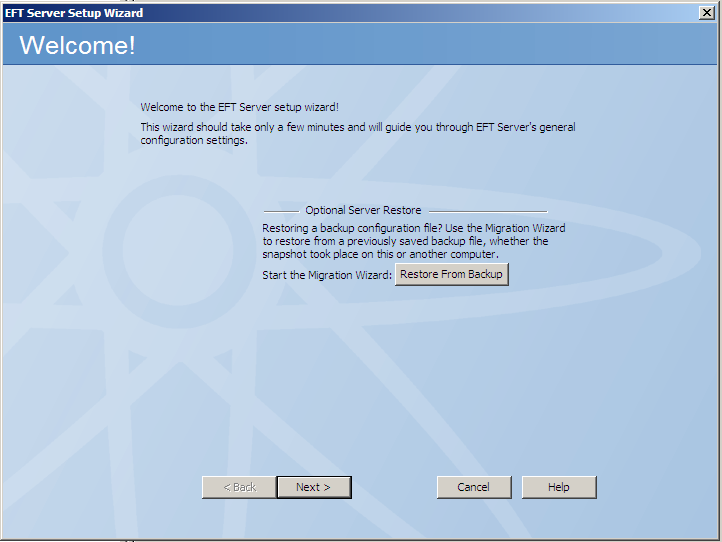
Anytime you connect to the GlobalSCAPE Server service, if no Servers have been defined, the Server Setup wizard Welcome page appears. The Server Setup wizard guides you through EFT Server configuration or allows you to restore from backup. The wizard helps you configure Server-specific options such as allowing remote administration. After the brief Server Setup wizard is completed, you have the option to run the Site Setup wizard to configure a Site, and then the User Setup wizard to provision a user.
You may cancel out of the Server Setup wizard anytime by clicking Cancel or the X in the upper right corner; however, any settings made through the wizard are discarded, except for keys/certificates added to the key manager (by creating or importing).
You will need the following information to create and configure a Server:
If you are allowing remote administration of EFT Server and you are using SSL, you need to know the SSL settings and have access to the SSL keys and certificates.
If you are restricting remote administration to specific IP addresses, you need to know the IP addresses and ports.
If you are using DMZ Gateway, install and configure DMZ Gateway before creating Servers and Sites. The installation and configuration of DMZ Gateway is not required before creating Servers and Sites, but the Site setup wizard asks for the DMZ Gateway information. Alternatively, you can configure DMZ Gateway after Site setup is complete, and then provide the DMZ Gateway connection information in EFT Server's administration interface.
If you are configuring your first EFT Server connection, refer to Configure the First EFT Server Connection, below. If you are configuring a new, remote EFT Server connection, jump to New (Remote) Connection.
You must first configure the local connection before you can configure a remote location.
To configure EFT Server on the local computer
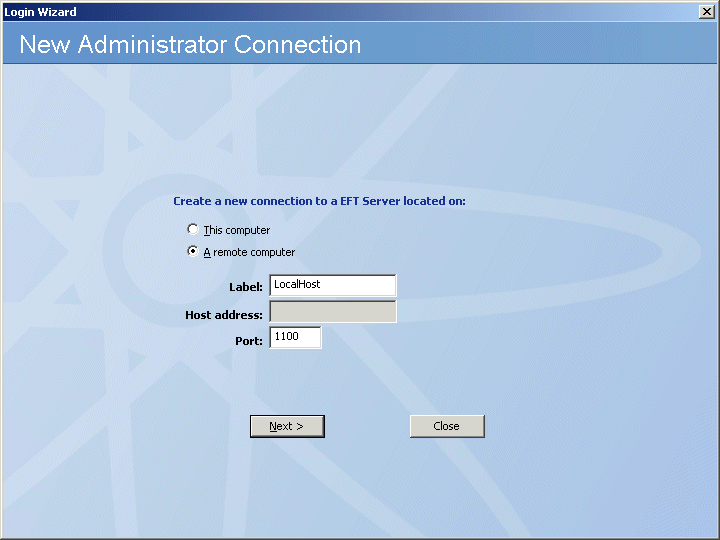
After installation is complete, the New Administrator Connection wizard appears. (If you have already defined a Server and want to create another one, refer to New (Remote) Connection.)

Leave This computer selected, then specify the Label for the local connection. By default, the label is LocalHost. Because LocalHost is a very common label, it is a good idea to change the label to something that is easily identifiable in error logs, reports, and remote connections. For example, GS_EFTS. You can label EFT Server anything you want; the EFT Server name is not dependent upon the computer name.
The EFT Server Administrator Login page appears.
Click the Authentication box and specify the type of authentication to use for this login. Future connections will default to the authentication type that you specify during this initial login, but you can choose a different type. Authentication types include:
EFT Server Authentication - Choose this option to log in with an EFT Server-specified administrator account, such as the one you created during installation.
Integrated Windows Authentication - Choose this option to log in as the currently logged on user (Integrated Windows Authentication). Requires the High Security Module (HSM).
Windows Authentication - Choose this option to log in using a specific Windows account. Requires the High Security Module (HSM).
If you specified EFT Server Authentication or Windows Authentication, in the Username and Password boxes, provide the login credentials that you created during installation. The Welcome page appears. Because you have not yet activated the software, the "Free Trial" reminders appear. After you activate, you will not see this prompt.
Do one of the following:
If you are evaluating the software or just do not want to activate yet, click Start Trial, then follow the procedures in Configuring EFT Server.
If you want to install the Secure Ad Hoc Transfer module, you should configure the Server, define at least one Site, and enable remote administration before installing the module.
If you have purchased a license, click Activate Now, then follow the procedures for activating the software.
Click Next. The Server Setup wizard Welcome page appears.
If you are not restoring from a backup (EFT Server Enterprise only), click Next.
If you are restoring from a backup, click Restore from Backup, then refer to Backing Up or Restoring Server Configuration for the procedure.
Click Next. The FIPS Options page appears.
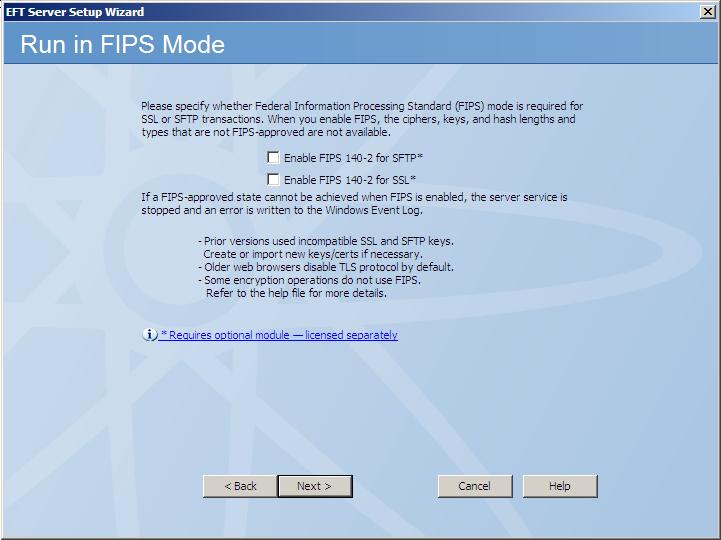
When you enable FIPS mode, the ciphers, keys, and hash lengths and types that are not FIPS approved are not available. If a FIPS-approved state cannot be achieved when FIPS is enabled, the EFT Server service is stopped and an error is written to the Windows Event Log.
To use FIPS for SFTP (SSH2), select the Enable FIPS for SFTP check box.
To use FIPS for SSL, select the Enable FIPS for SSL check box.
A confirmation prompt appears when you select either check box. When you enable FIPS, the EFT Server service must be restarted. Click OK to continue with FIPS enabled or click Cancel if you do not want to use FIPS and restart the EFT Server service.
Click Next. The Remote Administration page appears.
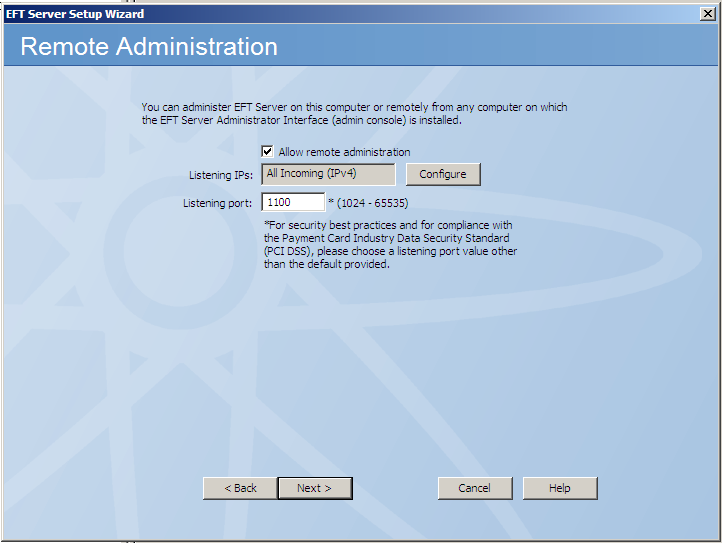
If you do not want to allow remote administration, clear the Allow remote administration check box.
If you want to allow remote administration:
Select the Allow remote administration check box and specify the Listening IPs.
Specify the Listening port. (For security best practices and compliance with the PCI DSS, specify a port other than the default of 1100.)
Click Next. If you chose remote administration, the Secure Remote Administration page appears.
Administrator account credentials are transmitted in plaintext unless SSL is enabled. Organizations complying with the PCI DSS are required to use SSL for remote administration. To enable secure remote administration, select the Use SSL for secure remote administration check box, then click Next. The SSL Certificate Options page appears.
Do one of the following:
In the Certificate and Private Key boxes, click the folder icon ![]() to browse for the private key pair files.
to browse for the private key pair files.
Click Create certificate to create one. Refer to SSL Certificate-Based Login, Creating Certificates and Importing a Certificate into the Trusted Certificate Database for information regarding certificates.
Click Next. The Auditing and Reporting page appears.
If you are using Auditing and Reporting, select the Enable auditing check box, then provide the information required to connect to the ARM database as described below. If you are not using Auditing and Reporting, skip to the next step. (Auditing and reporting is a requirement of the PCI DSS.)
In the Database type area, specify whether you are using SQL Server or Oracle for the auditing database. (Oracle available in EFT Server Enterprise only.)
In the Host[\Instance Name] box, type EFT Server name or IP address.
|
|
If you are using SQL Server as the Auditing Database, \InstanceName corresponds to SQL Server's notion of named instances, a feature that allows a given computer to run multiple instances of the SQL Server Database Service. For more information, refer to http://msdn2.microsoft.com/en-us/library/ms165614.aspx |
In the Authentication box, specify the type of authentication used by the database, either Windows Authentication or SQL Server Authentication.
If you choose SQL Server Authentication, you must also specify the "sa" username and password. In the Username and Password boxes, type the username and password used to connect to the database (not the EFT Server credentials).
In the Database Name box, type the name of the database.
In the Audit failure notification e-mail address box, type the e-mail address to which EFT Server is to send database connection error notifications. You can add as many e-mail addresses as needed; separate the addresses with a comma or semicolon. EFT Server uses its global SMTP e-mail settings from the SMTP Configuration to send the e-mails. You will configure those settings on the next page.
In the In case of audit database error area, specify an Action for EFT Server to take if there is an error with the database. To stop recording data, select Stop auditing. To continue recording data to a file, select Audit to folder, and specify the location for the log file.
|
|
UNC paths are supported. The GlobalSCAPE Server service must run on a computer that has access to the network share, and the full UNC path must be used, that is: \\xcvd.forest.intranet.xc\Common_Files, not G:\Common. IPv6 literals must use the Microsoft-specific IPv6 address form that uses "ipv6-literal.net" for use in a UNC path. (Refer to the Wiki article about IPv6 for more information about IPv6 literals in UNC paths.) |
Click Next. The specify SMTP Server Settings page appears.
In the From e-mail address box, specify the e-mail address for e-mail notifications (such as those triggered by Event Rules). This is the address that appears in the From box of e-mails sent by EFT Server. For example, type noreply@serverhost.com.
The e-mail address syntax is validated when you click OK. If the e-mail address contains invalid characters or does not contain the @, an error message appears. Click OK to dismiss the error message, then correct the address.
In the SMTP host address boxes, specify the SMTP server host address and port.
If the SMTP server requires authorization, select the check box and provide the Username and Password.
Click Next. Server Setup is complete.

You are offered the option of continuing to the Site Setup wizard, or quitting the wizard, saving EFT Server settings, and configuring the Site(s) later. You must configure at least one Site (a virtual host) to service inbound connections to EFT Server.
Click an option, then click Finish. If you chose FIPS mode for SSL and/or SSH, prompts appear explaining that EFT Server has entered FIPS mode. Click OK to dismiss the prompts.
If you chose Run the Site Setup wizard now, the Site Setup wizard Welcome page appears.
Refer to Defining Connections to EFT Server for the procedure for configuring the Site. The procedure differs depending on the user authentication type you choose.
After you have configured a local connection to EFT Server, you can create a remote connection.
To create a new (remote) EFT Server administrator connection
On the main menu click File > New Server. The New Administrator Connection page appears.
Be sure that the remote Server service is running, and that it allows remote administration. Then:
Click A remote computer.
In the Label box, provide a name for the remote Server.
In the Host address box, provide the IP address at which the remote Server allows connections.
In the Port box, provide the port through which the remote Server allows connections.
Click Next. The Login page appears.
Click the Authentication box and specify the type of authentication to use for this login. Future connections will default to the authentication type that you specify during this initial login, but you can choose a different type. Authentication types include:
EFT Server Authentication - Choose this option to log in with an EFT Server-specified administrator account, such as the one you created during installation.
Integrated Windows Authentication - Choose this option to log in as the currently logged on user (Integrated Windows Authentication). Requires the High Security Module (HSM).
Windows Authentication - Choose this option to log in using a specific Windows account. Requires the High Security Module (HSM).
If you specified EFT Server Authentication or Windows Authentication, in the Username and Password boxes, provide the login credentials that you created during installation. The Welcome page appears. Because you have not yet activated the software, the "Free Trial" reminders appear. After you activate, you will not see this prompt.
Do one of the following:
If you are evaluating the software or just do not want to activate yet, click Start Trial, then follow the procedures in Configuring EFT Server.
If you want to install the Secure Ad Hoc Transfer module, you should configure the Server, define at least one Site, and enable remote administration before installing the module.
If you have purchased a license, click Activate Now, then follow the procedures for activating the software.
Click Next. The Server Setup wizard Welcome page appears.
If you are restoring from a backup, click Restore from Backup, then refer to Backing Up or Restoring Server Configuration for the procedure. Otherwise, continue to the next step.
If you are not restoring from a backup (EFT Server Enterprise only), click Next. The FIPS Options page appears.
When you enable FIPS mode, the ciphers, keys, and hash lengths and types that are not FIPS approved are not available. If a FIPS-approved state cannot be achieved when FIPS is enabled, the EFT Server service is stopped and an error is written to the Windows Event Log.
To use FIPS for SFTP (SSH2), select the Enable FIPS for SFTP check box.
To use FIPS for SSL, select the Enable FIPS for SSL check box.
A confirmation prompt appears when you select either check box. When you enable FIPS, the EFT Server service must be restarted. Click OK to continue with FIPS enabled or click Cancel if you do not want to use FIPS and restart the EFT Server service.
Click Next. The Remote Administration page appears.
Because you are configuring a remote administrator connection, ensure that the Allow remote administration check box is selected.
Specify the Listening IPs.
Specify the Listening port. (For security best practices and compliance with the PCI DSS, specify a port other than the default of 1100.)
Click Next. The Secure Remote Administration page appears.
Administrator account credentials are transmitted in plaintext unless SSL is enabled. Organizations complying with the PCI DSS are required to use SSL for remote administration. To enable secure remote administration, select the Use SSL for secure remote administration check box, then click Next. The SSL Certificate Options page appears.
Do one of the following:
In the Certificate and Private Key boxes, click the folder icon ![]() to browse for the private key pair files.
to browse for the private key pair files.
Click Create certificate to create one. Refer to SSL Certificate-Based Login, Creating Certificates, Importing a Certificate into the Trusted Certificate Database for information regarding certificates.
Click Next. The Auditing and Reporting page appears.
If you are using Auditing and Reporting, select the Enable auditing check box, then provide the information required to connect to the ARM database as described below. If you are not using Auditing and Reporting, skip to the next step. (Auditing and reporting is a requirement of the PCI DSS.)
In the Database type area, specify whether you are using SQL Server or Oracle for the auditing database. (Oracle available in EFT Server Enterprise only.)
In the Host[\Instance Name] box, type EFT Server name or IP address.
|
|
If you are using SQL Server as the Auditing Database, \InstanceName corresponds to SQL Server's notion of named instances, a feature that allows a given computer to run multiple instances of the SQL Server Database Service. For more information, refer to http://msdn2.microsoft.com/en-us/library/ms165614.aspx |
In the Authentication box, specify the type of authentication used by the database, either Windows Authentication or SQL Server Authentication.
If you choose SQL Server Authentication, you must also specify the "sa" username and password. In the Username and Password boxes, type the username and password used to connect to the database (not the EFT Server credentials).
In the Database Name box, type the name of the database.
In the Audit failure notification e-mail address box, type the e-mail address to which EFT Server is to send database connection error notifications. You can add as many e-mail addresses as needed; separate the addresses with a comma or semicolon. EFT Server uses its global SMTP e-mail settings from the SMTP Configuration to send the e-mails. You will configure those settings on the next page.
In the In case of audit database error area, specify an Action for EFT Server to take if there is an error with the database. To stop recording data, select Stop auditing. To continue recording data to a file, select Audit to folder, and specify the location for the log file.
|
|
UNC paths are supported. The GlobalSCAPE Server service must run on a computer that has access to the network share, and the full UNC path must be used, that is: \\xcvd.forest.intranet.xc\Common_Files, not G:\Common. |
Click Next. The specify SMTP Server Settings page appears.
In the From e-mail address box, specify the e-mail address for e-mail notifications (such as those triggered by Event Rules). This is the address that appears in the From box of e-mails sent by EFT Server. For example, type noreply@serverhost.com.
The e-mail address is validated when you click OK. If the e-mail address contains invalid characters or does not contain the @, an error message appears. Click OK to dismiss the error message, then correct the address.
In the SMTP host address boxes, specify the SMTP server host address and port.
If the SMTP server requires authorization, select the check box and provide the Username and Password.
Click Next. Server Setup is complete.
You are offered the option of continuing to the Site Setup wizard, or quitting the wizard, saving EFT Server settings, and configuring the Site(s) later. You must configure at least one Site to service inbound connections to EFT Server.
Click an option, then click Finish. If you chose FIPS mode for SSL and/or SSH, prompts appear explaining that EFT Server has entered FIPS mode. Click OK to dismiss the prompts.
If you chose Run the Site Setup wizard now, the Site Setup wizard Welcome page appears.
Refer to Defining Connections to EFT Server for the procedure for configuring the Site. The procedure differs depending on the user authentication type you choose.