
Adding Servers to Manage
You can manage AIX, Linux, and Windows servers from the same Security Auditor console. The supported versions and distributions are:
- AIX 5.3, 6.1 and 7.1
- RHEL 6 & 7, Ubuntu 14 & 15, CentOS 6 & 7, Oracle Linux 6 & 7, and SLES 11 & 12
- Windows 7 or newer, Windows Server 2008 or newer (local User Account policies only)
Security Auditor can also monitor a cloud service, such as AWS, and enroll server instances automatically to be checked against a Group Policy. See Working with Cloud Server Instances.
Adding a Windows Server
Security Auditor allows you to manage User Account policies for local users on Windows systems in your network. Do the following to add a Windows server:
- On the remote computer, run the following Powershell commands:
Enable-PSRemoting -Force
Set-PSSessionConfiguration -ShowSecurityDescriptorUI -Name Microsoft.PowerShell -Force
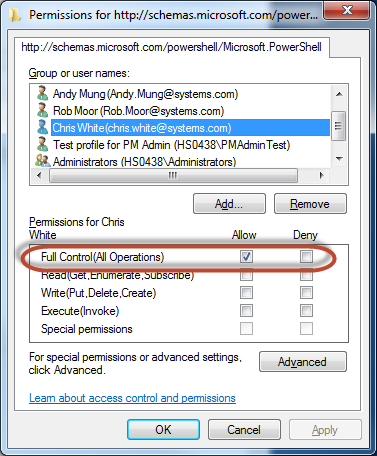
The second command launches the Permissions dialog box.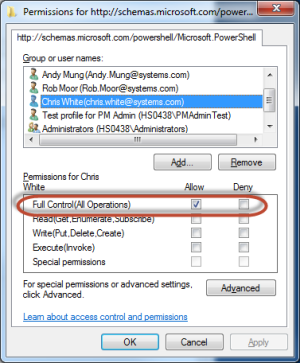
The connecting user must be given "Full Control" access on that dialog. The connecting user must also have sufficient access to run the commands. - To enable authentication, add the remote computer to the list of trusted hosts for both the console and managed endpoints. Enter the following Powershell commands to:
- List the current values.
- Add your new servers. Append servers to the end, separated by commas.
Get-Item -Path WSMan:\localhost\Client\TrustedHosts
Set-Item WSMan:\localhost\Client\TrustedHosts -Value ‘server1,server2’
NOTE: As such, the Security Auditor console inserts managed endpoints here -Value ‘server1,server2’ and the managed endpoints put the Security Auditor console here -Value ‘server1,server2’. - Open Security Auditor in your browser.
- If you use the same administrator account to login to systems across your network, and would like to setup Security Auditor to use that account automatically when setting up new Windows servers to be managed, go to Admin Tasks > Preferences. Under "Windows User," enter the credentials for your administrator account and click Save.
- Go to Servers > Add a Server or click Add on the Manage Servers page.
- For Server Type, choose Windows, then enter a name, description, group and IP address.
- For Connection Option, choose Default User and Password to use the credentials you specified in the Preferences screen. Or, choose Server Specific User and Password to specify the credentials for this server individually.
- Click Save. You are now ready to begin defining User Account policies. See User Accounts.
Adding a Non-Windows Server
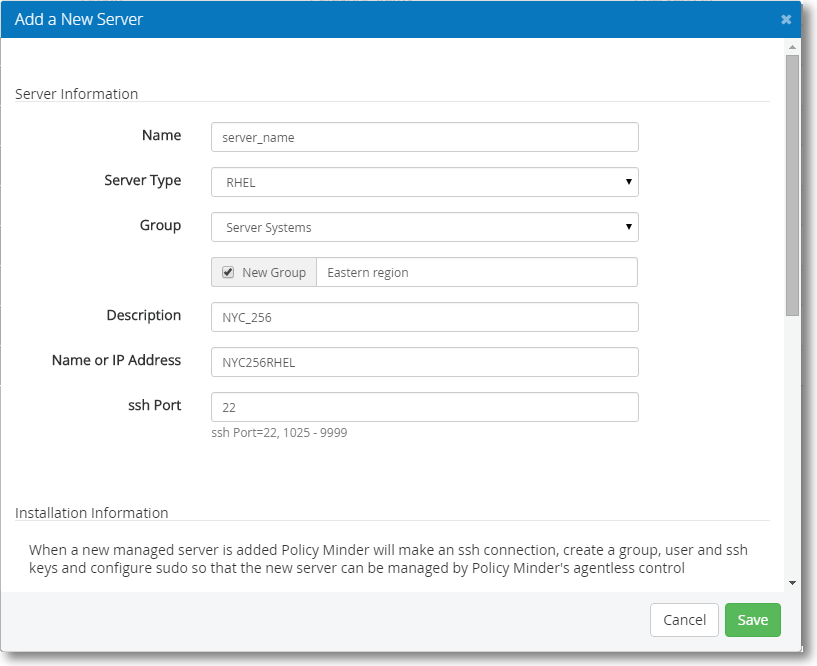
- Go to Servers > Add a Server or click Add on the Manage Servers page. The Add a New Server screen appears.
- Fill in the dialog with the details of the server you want to manage through the Security Auditor console.
- For Name, you can use the following variables:
- {nameoripaddress}
- {servertype}
- {hostname}
- For Description, you can use the following variables:
- {name}
- {nameoripaddress}
- {servertype}
- {hostname}
- For Name or IP Address, you can use the variable {name}
- For Name, you can use the following variables:
- For Group, you can select an existing group, or check New Group to create a new one. See Server Groups.
- Specify the Installation Information:
Options when adding a non-Windows server
Option 1: If you take the default settings, you will need to provide root’s password to make the initial connection. When the connection is made, the Security Auditor User policym and the Security Auditor Group policym will be created and the sudoer’s file updated to provide the user policym with the ability to run the commands needed for the Security Auditor product. Subsequent connections are made via SSH and use certificates, not user / password to establish the connection.
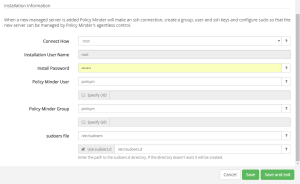
Alternative to Option 1: Some organizations do not allow root to make an SSH connection. In this case you can use su. Use the drop down box for Connect How and choose su. You will be prompted to enter root’s password (so you can use SU on the server you’re adding). You must also specify a user and password to make the initial connection. This user MUST be able to SU to root.
Another alternative to Option 1: Ubuntu doesn’t have the concept of root so when adding an Ubuntu server, use the option to connect with sudo. To choose this option, use the drop down box for Connect How and choose sudo. The user specified in the Installation User Name field must be a user who can execute admin commands using sudo.
Option 2: By default a user and a group named policym will be created on each server. You may want to create a user and/or group by a different name than policym. Or you may want to specify the UID or GID for the user/group. To do so, name the user, group, and specify a UID and GID.
NOTE: If the user or group do not already exist, they will be created with the UID / GID specified (if any).)Option 3: By default, the commands required by Security Auditor will be added on the server being added in the /etc/sudoers.d file. If you uncheck this option, the commands will be added directly to the sudoers file. However, some organizations control how and by whom the sudoers file is updated. If this is the case, you can add the stanza to the sudoers file yourself. Add the Managed Server. In the Install log that is generated will be the stanza that needs to be added to the sudoers file. As part of adding the stanza to the sudoers file, be sure to change the host name to the server you’re adding. Once that stanza is added (with the current host server name), run the Add Managed Server again. Security Auditor will detect that the commands have already been added and the install will complete successfully.
Option 4: If you would like to authenticate with the server using an SSH key for installation purposes, you can do so by specifying a private key. You might choose this option if you are installing on a cloud server instance (e.g. Amazon Web Services (AWS)). To do so:
- Identify the private key used to communicate with the server. (This key is generally only available when the key pair is created.) If the same key is used for multiple servers, you may want to save a managed key in Security Auditor's Manage Private Keys screen for easy access.
- When adding the server, in the Installation Authentication section of the Add a New Server or Add Multiple Servers screen, select one of the three Private Key options. Choose 'Private key (Copy/Paste)' to paste the key, choose 'Private key .pem file' to select a .pem file containing the key, or Managed Private Key to select a key you have loaded into Security Auditor's Manage Private Keys database.
- When you click Save or Save and exit, a one-time SSH connection is made to the server that will configure the server based on the Installation Configuration. Installation will create the user and group specified, and create a different public/private key pair allowing the Security Auditor console SSH access as that user (e.g. the user policym will be created on the server you are adding). If using a Password, the initial connection does NOT have to be as root; however, it must have sufficient rights to modify the sudoers file on the server being added. If you use an SSH key for installation, the key is not used again or recorded by Security Auditor (unless it had been saved in Manage Private Keys).

Adding Multiple Servers
If you have many servers to manage you can add them quickly using the Add Multiple Servers screen.
- Choose Servers > Add Multiple Servers. The Add Multiple Servers screen appears.
- Specify the Server Type. All servers added must be of the same platform.
- Specify the Server Names. You can specify the server names individually, separated by a semicolon or line feed. Names can be a server and DNS name (MyServer or 192.168.1.1), or a server@DNS name combination (MyServer@192.168.1.1 or MyServer@DNSName.com).EXAMPLE:
Server1; Server2; 192.168.1.1; MyServer@MyDNSName.com
or
Server1
Server2
Server3
192.168.1.1
MyServer@MyDNSName.comTo expedite the process, tell Security Auditor to identify servers on your network using dynamic naming. For example, Server[1-100] will identify all servers named "Server" followed by an integer from 1-100 (e.g. Server1; Server2; Server29; Server99). Server[001-100] will identify servers similarly, but using the leading zeros (e.g. Server001; Server002; Server029; Server099). The syntax Server[a,b,c,x,z], Server[10,15-20, 35], and MyServer@192.168.1.[1-10] are also valid.
EXAMPLE:
Server[1-400]; Server[001-400]; Server[a,b,c], Server[10-67]You can add the same server to Security Auditor more than once by specifying multiple names for the same IP address or DNS name.
EXAMPLE:
MyAccountingServer1@192.168.1.1, MyAccountingServer2@192.168.1.1 - Use the available variables ({name}, {nameoripaddress}, {servertype}) to identify the desired Description.
EXAMPLE:
Server: {name} DNSName: {nameoripaddress} ServerType: {servertype}
Could yield
Server: MyAccountingServer1 DNSName: 192.168.1.1 ServerType: AIX - For Group, you can select an existing group, or check New Group to create a new one. See Server Groups.
- Specify the Installation Information:
Options when adding a non-Windows server
Option 1: If you take the default settings, you will need to provide root’s password to make the initial connection. When the connection is made, the Security Auditor User policym and the Security Auditor Group policym will be created and the sudoer’s file updated to provide the user policym with the ability to run the commands needed for the Security Auditor product. Subsequent connections are made via SSH and use certificates, not user / password to establish the connection.
Alternative to Option 1: Some organizations do not allow root to make an SSH connection. In this case you can use su. Use the drop down box for Connect How and choose su. You will be prompted to enter root’s password (so you can use SU on the server you’re adding). You must also specify a user and password to make the initial connection. This user MUST be able to SU to root.
Another alternative to Option 1: Ubuntu doesn’t have the concept of root so when adding an Ubuntu server, use the option to connect with sudo. To choose this option, use the drop down box for Connect How and choose sudo. The user specified in the Installation User Name field must be a user who can execute admin commands using sudo.
Option 2: By default a user and a group named policym will be created on each server. You may want to create a user and/or group by a different name than policym. Or you may want to specify the UID or GID for the user/group. To do so, name the user, group, and specify a UID and GID.
NOTE: If the user or group do not already exist, they will be created with the UID / GID specified (if any).)Option 3: By default, the commands required by Security Auditor will be added on the server being added in the /etc/sudoers.d file. If you uncheck this option, the commands will be added directly to the sudoers file. However, some organizations control how and by whom the sudoers file is updated. If this is the case, you can add the stanza to the sudoers file yourself. Add the Managed Server. In the Install log that is generated will be the stanza that needs to be added to the sudoers file. As part of adding the stanza to the sudoers file, be sure to change the host name to the server you’re adding. Once that stanza is added (with the current host server name), run the Add Managed Server again. Security Auditor will detect that the commands have already been added and the install will complete successfully.
Option 4: If you would like to authenticate with the server using an SSH key for installation purposes, you can do so by specifying a private key. You might choose this option if you are installing on a cloud server instance (e.g. Amazon Web Services (AWS)). To do so:
- Identify the private key used to communicate with the server. (This key is generally only available when the key pair is created.) If the same key is used for multiple servers, you may want to save a managed key in Security Auditor's Manage Private Keys screen for easy access.
- When adding the server, in the Installation Authentication section of the Add a New Server or Add Multiple Servers screen, select one of the three Private Key options. Choose 'Private key (Copy/Paste)' to paste the key, choose 'Private key .pem file' to select a .pem file containing the key, or Managed Private Key to select a key you have loaded into Security Auditor's Manage Private Keys database.
- When you click Save or Save and exit, a one-time SSH connection is made to the server that will configure the server based on the Installation Configuration. Installation will create the user and group specified, and create a different public/private key pair allowing the Security Auditor console SSH access as that user (e.g. the user saadmin will be created on the server you are adding). If using a Password, the initial connection does NOT have to be as root; however, it must have sufficient rights to modify the sudoers file on the server being added. If you use an SSH key for installation, the key is not used again or recorded by Security Auditor (unless it had been saved in Manage Private Keys).
Server Groups
You can create Server Groups to organize your servers for easier management, and in order to apply policies to multiple servers at once. You can create a new group when adding a new server. If you do nothing, all servers will be in the default group – Server Systems.
All servers in a Server Group must share the same operating system.
 Previous