Map Settings Window
Left pane of the
Map Settings Window
Use the Map Settings window to specify colors for the map, to specify a background image, and to specify default thresholds and notifiers. Any changes you make are saved with the map, and do not affect any other maps.
To view the Map Settings Window:
- Make sure the map is in Edit mode.
- From the Edit menu, select Map Settings. The Map Settings Window is displayed. The left pane contains a menu. The right pane contains the settings for the selected section of the menu.
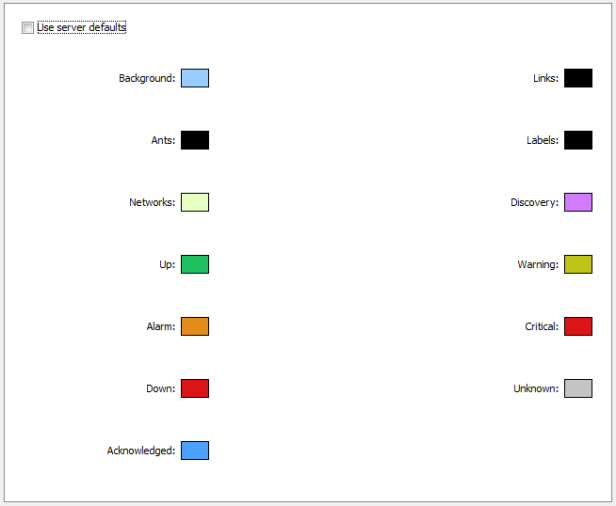
To view and edit the colors for the current map:
From the Appearance section of the Map Settings window, select Colors. The current colors for the map are displayed.
Intermapper uses a default color scheme that is controlled by the default map colors window. This color scheme applies to all new maps and to those maps for which the Use server defaults box is selected.
For more information on changeable colors, see Colors you can change.
To use a set of colors different from the global color scheme:
- Clear the Use server defaults check box.
- Click the color box for the first color you want to change. The Color Picker window is displayed.
- Select a color and click OK. The new color is displayed in the selected color box.
- Repeat steps 2 and 3 for each color you want to change.
- Click OK.
To restore the current map to the default color settings:
- Select the Use server defaults check box.
- Click OK. The map uses the default colors. The colors you defined are still saved with the map.
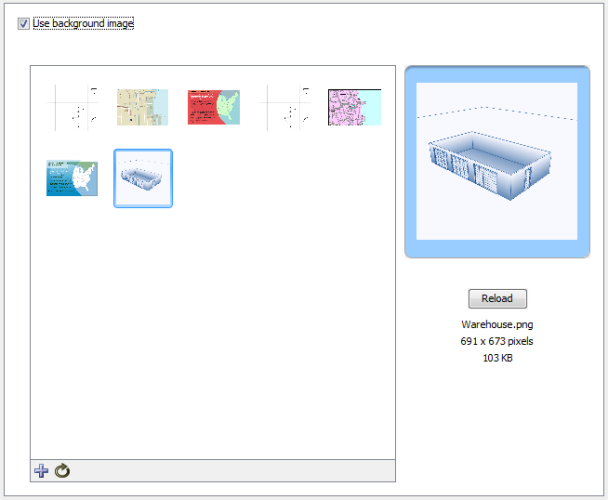
You can define a background image for any map. The background image is displayed behind the map contents (devices, icons, and links on the map).
You can use a background image containing a floor plan of an office and move the items on the map to show the locations of each device in the office. You can also use an image containing street map of a city or topographic map of a county or state.
For more information, see Background Images.
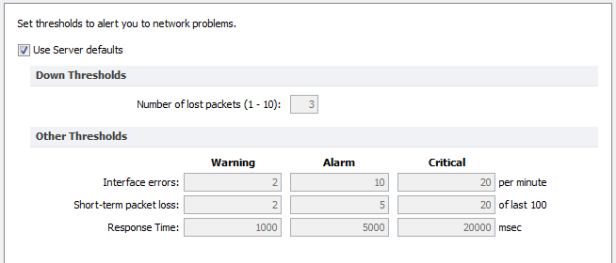
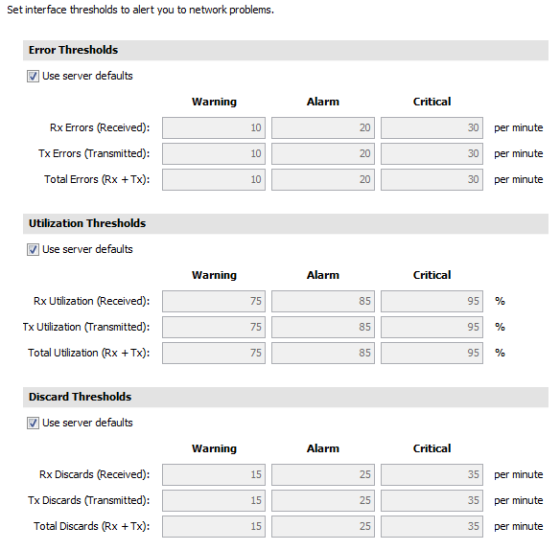
Intermapper can provide warnings or alerts when interface errors, packet loss, or round-trip times get too high. You can set default thresholds for all of these metrics from the Map Settings window.
- Use Server Defaults - select this check box to override the map settings and use the server default settings.
- Down Thresholds - Enter the number of lost packets required to generate a Down state.
- Other Thresholds - For each metric, in each column enter a value required to generate the a Warning, Alarm, or Critical state.
Use the Interface Thresholds pane of the Map Settings window to set Error, Link Utilization, and Discard thresholds for a specific map. These settings are applied to interfaces on each new device added to the map.
To create map-specific interface thresholds:
- Clear the Use server defaults check box for the threshold type you want to make specific to this map.
- Set the thresholds for the selected threshold type.
- Click OK.
Use traffic indicators to view network activity on a map. You can set the traffic levels at which moving ants show you the level and direction of activity on a particular link.
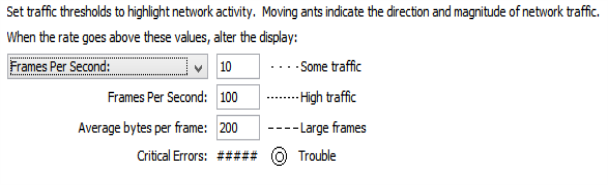
You can set the following values to control the appearance of traffic indicators:
- Traffic units - select bytes or frames per second from a menu. This unit is used for traffic thresholds.
- Some traffic - type the number of bytes or frames per second that represents some traffic.
- High traffic - type the number of bytes or frames per second that represents high traffic.
- Large Frames - type the number of bytes per frame that represents a large frame.
- Critical Errors - this threshold is set in the Interface Thresholds panel.
To set the default values for traffic indicators:
- In an editable map, select Map Settings from the Edit menu. The Map Settings window is displayed.
- In the left pane, click Traffic Indicators. The current traffic indicator settings for the map appear in the right pane.
- Enter the settings you want to change and click OK. The map uses the new settings.
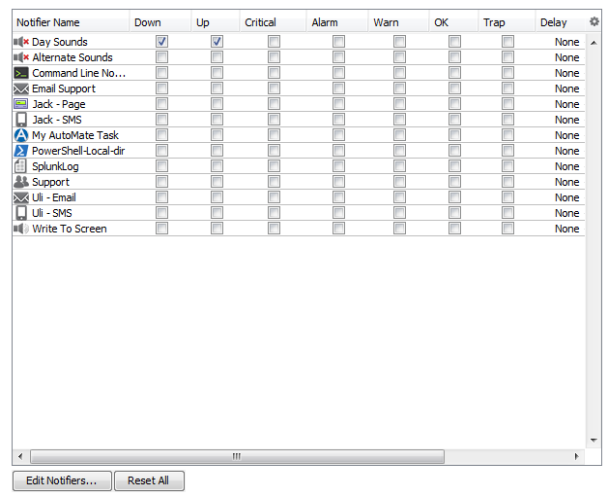
Use the Map Settings window to specify the notifiers you want to attach to new devices in this map by default.
To specify the default notifiers for the current map:
- For each map state, select the check box for each notifier you want to attach to that state. For more information, see Configuring a Notifier.
- To choose all notifiers at once, Alt-click or Cmd-click (Mac) a check box in any column. All boxes are selected or cleared in that column. You can also use Alt-click to set Delay and Repeat to the same value for all notifiers.
To edit a notifier:
- Click the row of the notifier you want to edit. The notifier row is highlighted and the Edit Notifiers button is enabled.
- Click Edit Notifiers. The Configure Notifier window for the selected notifier is displayed. For more information, see Working With Notifiers.
If you changed the default notifier or edited its settings, you can reset all of the devices on the map
To reset the default notifier or its settings for all devices on the map:
Click Reset All. All devices on the map
If you are using Intermapper Database to collect device and network data, you can specify a default retention policy for a map. This setting overrides the default policy set in the Server Settings window.
Use the Map Settings window to specify the Retention Policy you want to use with new devices in this map. Data Retention Policies are defined from the Retention Policy pane of the Server Settings window.
Use the Retention Policy panel to select a retention policy for new devices added to the map.
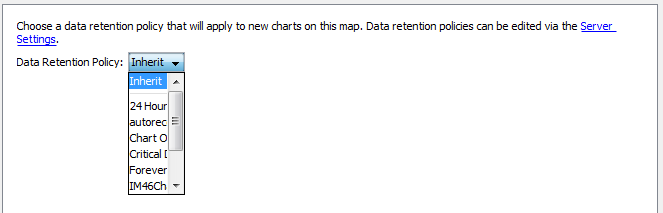
Data Retention Policy - select a retention policy from the menu.
Use the Layer 2 Settings panel to turn on Layer 2 scanning for a map and to choose how Layer 2 connections should appear. To use this panel, you must enable Layer 2 collection in the Layer 2 pane of the Server Settings window.
Automatic Changes
When using Layer 2, you can allow the map to be edited automatically. Intermapper uses Layer 2 information to rearrange the map to match the current topology of your network. This is not a precise task; it depends on the accuracy and completeness the information collected during the Layer 2 scan.
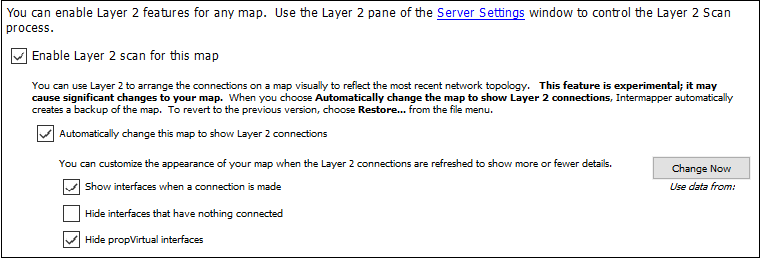
- Enable Layer 2 scan for this map - select this check box to allow this map to be edited using Layer 2 scan results.
- Automatically change this map to show Layer 2 connections - select this check box to allow Intermapper to edit the map automatically to show Layer 2 connections.
- Change Now - click this button to initiate the visual arrangement of connections on the map to reflect the most recent topology using Layer 2 data.
- Show interfaces when a connection is made - select this check box to show Layer 2 interfaces when a connection is made.
- Hide interfaces that have nothing connected - select this check box to limit the number of interfaces shown to those that have something connected to them.
- Hide propVirtual interfaces - select this check box to hide interfaces whose ifType is propVirtual.