Creating an Advanced Security Site
When you run the Site creation wizard, you have the option to create a Site with advanced security options enabled and that can monitor, report, and/or warn when those settings are changed and can cause compliance violations. (Requires RCM.)
Prerequisites:
-
Auditing and Reporting module enabled
-
Regulatory Compliance Module module activated or in trial
Constraints:
For details of configuring Servers and Sites, and enabling ARM on EFT, refer to the following topics:
You will need the following information to create and configure a high security-enabled Site:
-
Listening IP address for the Site
-
Site root folder path (location)
-
User authentication provider type
-
The email address for emailing the PCI DSS Compliance Report.
-
SSL certificate pair and SFTP key pair if applicable
The wizard performs several checks and asks you to provide information or make changes based on the results of those checks, including:
-
Is the RCM in the trial period?
-
If not in trial period, is the module activated?
-
Is ARM enabled?
-
Which authentication method are you using to authenticate users?
-
Is remote administration enabled?
-
Is SSL enabled for remote administration?
-
Are password security options for delegated administration set?
-
Is the daily PCI DSS report enabled?
-
Is the default banner for SFTP used?
The wizard is quite intuitive and provides instructions where necessary. The wizard pages change based on your selections. The procedure below walks you through the most common scenarios.
To configure an advanced security-enabled Site
-
Do one of the following:
-
After Server setup is complete, the Site Setup wizard appears.
-
In the administration interface, click Configuration >New Site.
The Site Setup wizard Site Security Policy page appears.
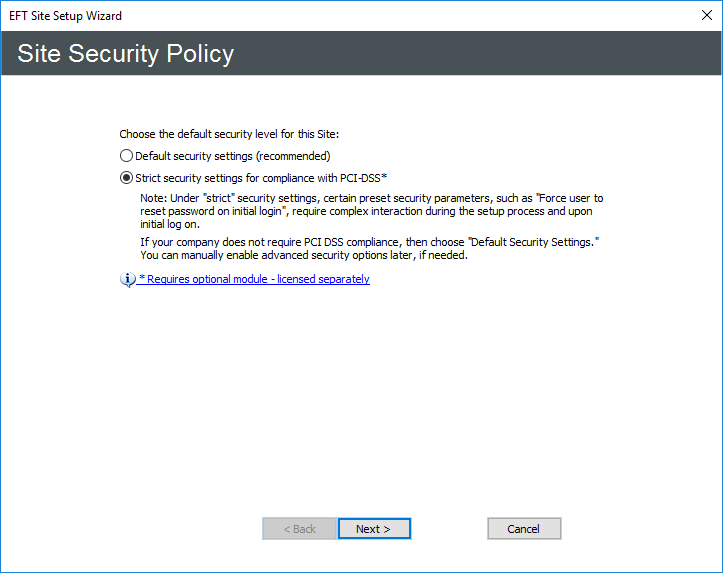
-
-
Click Strict security settings, and then click Next. The Site Label and Listening IP page appears.
-
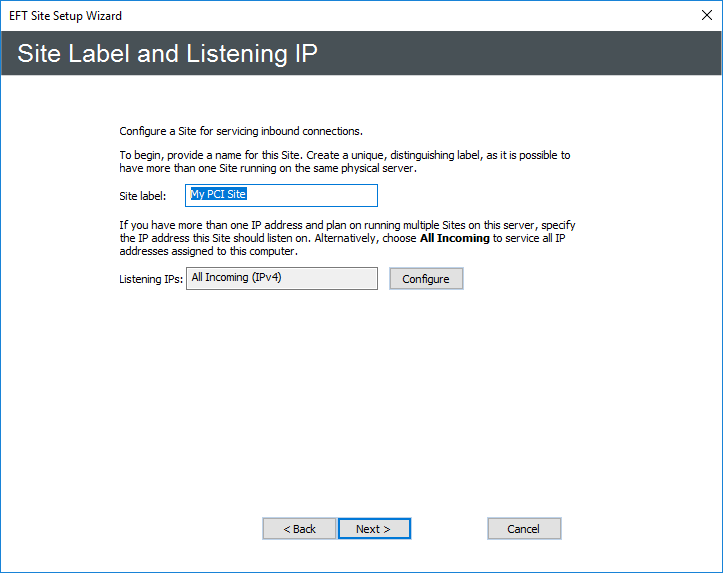
In the Site label box, type a name a unique name for the Site. The default name is MySite, but you can change it to anything you want. The name you provide here will appear in the EFT tree in the left pane of the administration interface and in reports and messages.
-
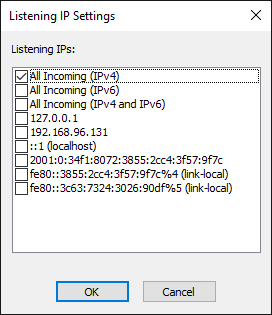
Next to the Listening IPs box, click Configure. The Listening IP Settings dialog box appears.
-
Select one of the All Incoming check boxes, or one or more specific IP addresses on which this Site should listen for incoming connections, and then click OK.
-
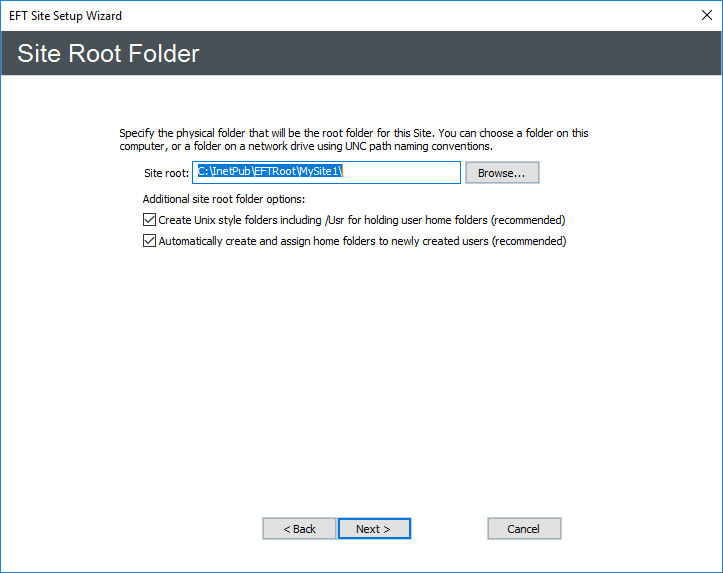
Click Next. The Site Root Folder page appears.
-
In the Site root box, leave the default or click Browse to specify the root folder. For HA cluster configured Sites, the Site root is in the HA shared configuration folder.
-
In the Additional site root folder options area, select or clear the check boxes as needed:
-
Select the Create UNIX-style subfolders including /Usr for holding user home folders check box with appropriate permissions under the Site root folder. This is only necessary if you are trying to mimic a typical default *nix Server setup, but the check box is selected by default.
-
Select the Automatically create and assign home folders to newly created users check box to create a user folder automatically under /Site Root/Usr/ when a new user is added.
-
-
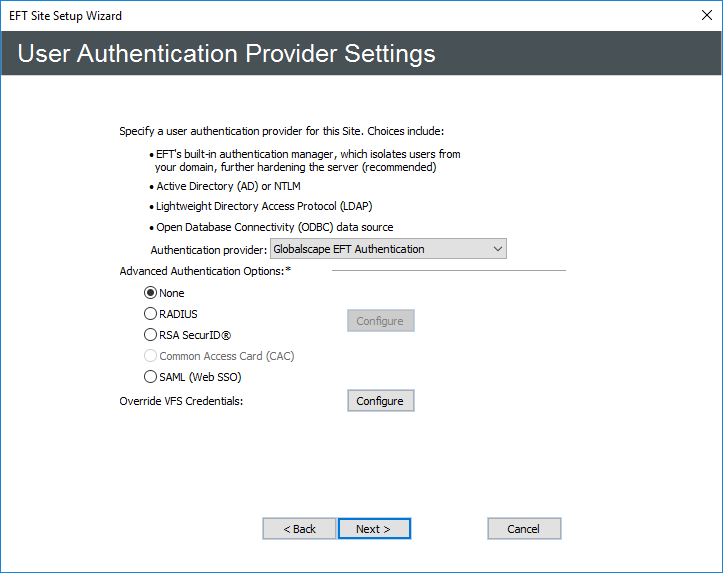
Click Next. The User Authentication page appears.
-
In the Authentication type list, specify one of the following authentication methods that this Site will use to authenticate user connections:
-
Globalscape Server Authentication
-
Windows Active Directory Authentication - If you are using this method, also refer to Windows Active Directory Authentication.
-
If you are using Active Directory with RADIUS or RSA SecurID, click the applicable option and then click Configure to configure the RSA or RADIUS settings.
-
LDAP Authentication - If you are using this method, also refer to LDAP Authentication.
-
ODBC authentication - If you are using ODBC authentication, also refer to ODBC Authentication.
When you create a high security-enabled Site that uses AD or LDAP authentication, the following states will not be audited for user accounts, but will be audited for non-AD administrator accounts:
-
Password complexity and length requirements
-
Password reset requirements
-
Password expiration requirements
-
Password emailing to user requirements
The same PCI DSS requirement checks are skipped when RADIUS or RSA SecurID is used, and compensating controls are shown in their place.
-
-
Under Advanced Authentication Options, specify whether this Site will use RADIUS, RSA SecurID, or the default of None. (Common Access Card (CAC) authentication is not allowed for high security-enabled Sites.)
-
If RADIUS or RSA SecurID is selected, click Configure, then:
-
RADIUS: Specify the RADIUS authentication settings, and then click OK.
-
RSA SecurID: Specify the location of the RSA Server configuration file (sdconf.rec), then click OK. (Note that SecurID files will reside in this location. Node secret and sdstatus.12 files will be generated at this location.)
-
(Optional) Next to Override VFS Credentials, click Configure. Enable and provide login information, if needed. (Refer to Override VFS Credentials for details of this option.)
-
-
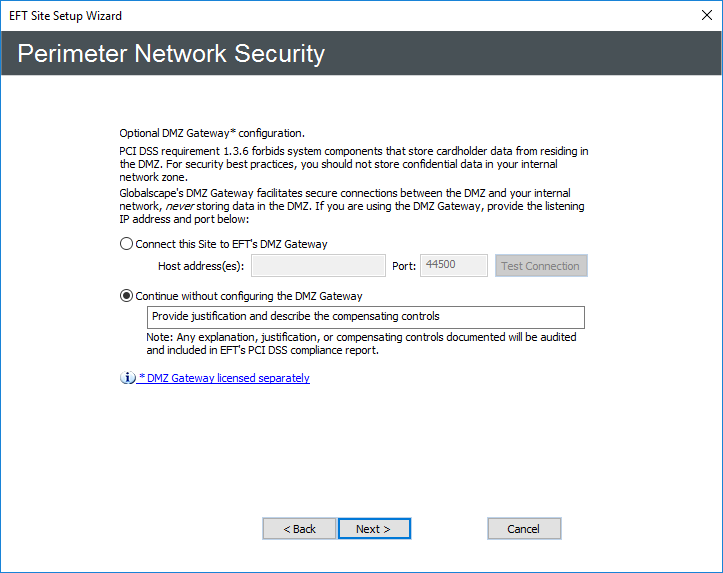
Click Next. The Perimeter Network Security page appears.
-
If you are using the DMZ Gateway module, provide the IP address and port to connect the Site to DMZ Gateway, then click Test Connection to verify that the Site can connect to DMZ Gateway. If the Site is unable to connect, you can continue without enabling DMZ Gateway and enable it later.
-
If you choose not to connect to DMZ Gateway or have not yet installed DMZ Gateway, click in the text box and provide a reason (compensating control) for not using DMZ Gateway. (The reason will appear in the Description box of the PCI DSS Compliance report.)
-
Click Next.
-
If you specified a default port for DMZ Gateway, the Vendor Defaults page appears. Change the port number to a non-default number, or provide a reason for keeping the default port. (The reason will appear in the Description box of the PCI DSS Compliance report.)
-
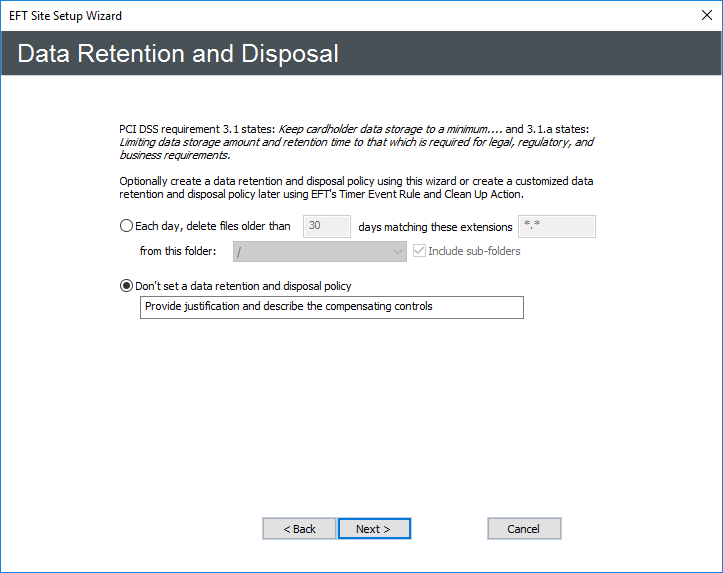
The Data Retention and Disposal page appears.
-
Do one of the following:
-
Click Each day, delete file older than n days matching these extensions from this folder, then specify the file extensions to be deleted, the frequency, and the folder from which to delete them. Select the Include subfolders check box to delete the files from the subfolders.
-
Click Don't set a data retention and disposal policy, then, in the text box, provide the justification and compensating control. (The reason will appear in the Description box of the PCI DSS Compliance report.) Refer to Specifying File Deletion Options for more data wiping options. You can always setup a clean-up policy later.
-
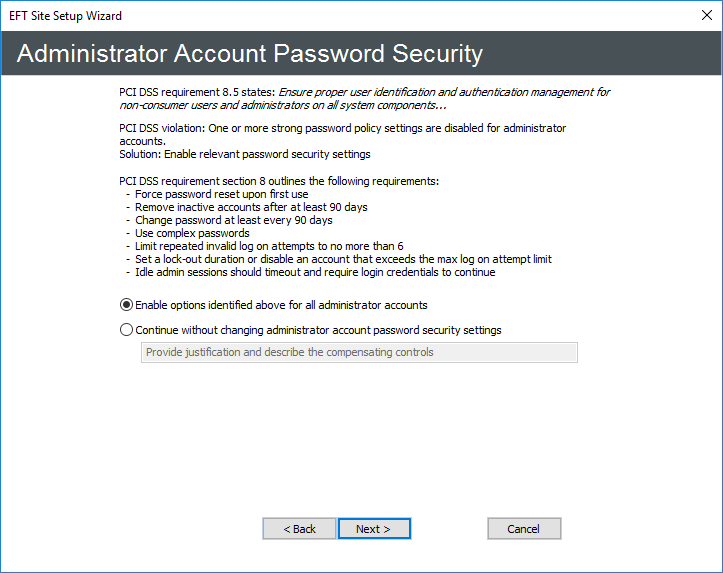
Click Next. The Administrator Account Password Security page appears.
-
Keep the default of Enable options identified above for all administrator accounts (password security settings) or click Continue without changing administrator account password security settings, then provide the justification and compensating control. (The reason will appear in the Description box of the PCI DSS Compliance report.) You can specify these password security settings individually after you create the Site.
-
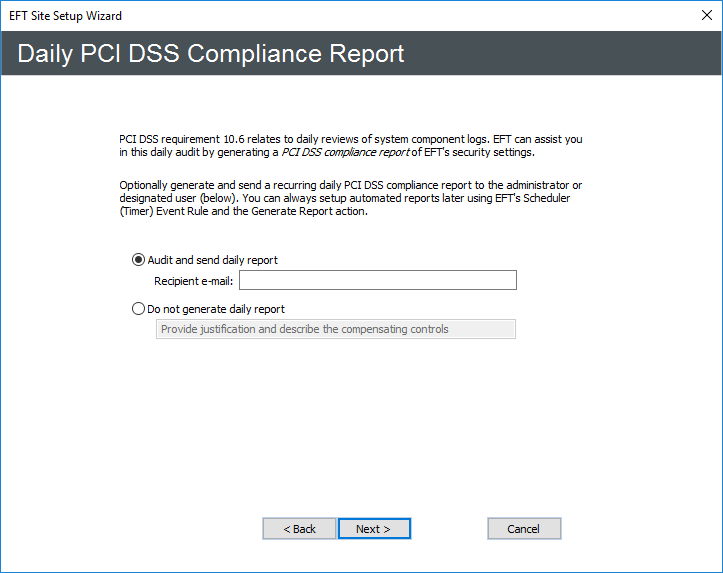
Click Next. The Daily PCI DSS Audit Report page appears.
-
Do one of the following:
-
Click Audit and send daily report, then provide the recipient's email address. (The SMTP settings were configured during Server setup.)
-
Click Do not generate daily report and type a reason for not generating the report automatically. For example, you can manually generate the report as needed in the administration interface. (The reason will appear in the Description box of the PCI DSS Compliance report.)
-
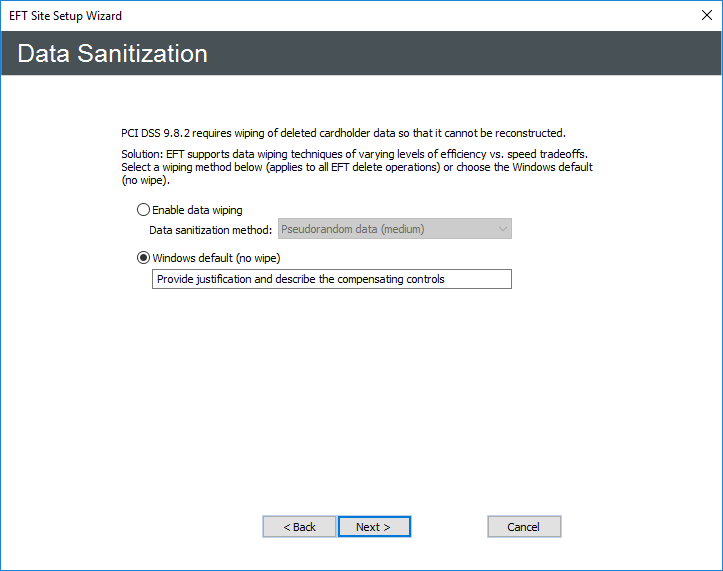
Click Next. The Data Sanitization page appears.
-
Do one of the following:
-
Click Enable data wiping, then, in the Data sanitization method box, click which method EFT is to use to wipe data.
-
Click Windows default (no wipe) and type a reason for not specifying a data sanitization method for EFT to use. For example, you might be using a third-party tool for sanitization. (The reason will appear in the Description box of the PCI DSS Compliance report.)
-
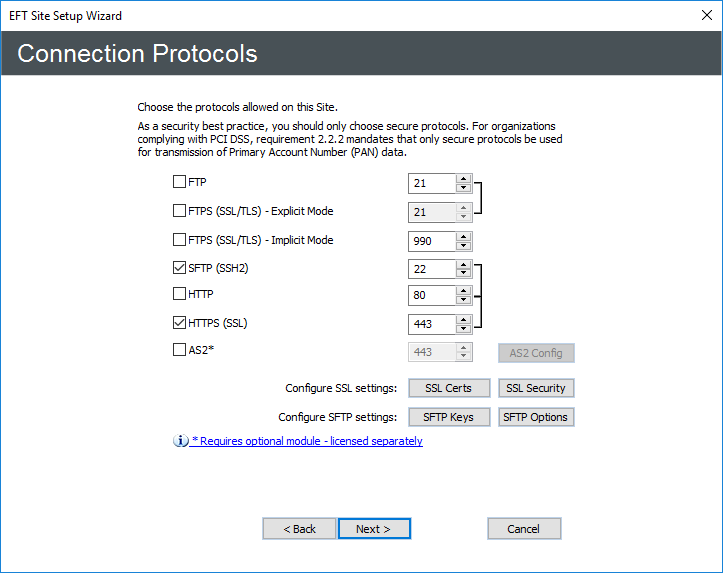
Click Next. The Connection Protocols page appears.
-
Select one or more protocol check boxes and specify the port numbers that this Site will use to connect to EFT. If you specify plain text FTP or HTTP, after you click Next, EFT will prompt you to disable these insecure protocols or continue and supply justification.
-
If you choose SSL, click SSL options and SSL certs for further configuration.
-
Click SSL options to define the allowed SSL versions and ciphers. Some Web browsers do not have TLS turned on by default, which causes things like redirecting to the password reset page to fail, because the browser cannot make the SSL connection, and it returns an error. For this reason, default SSL security options for a high security-enabled Site include SSL 3.0 in addition to TLS 1.0.
-
Click SSL certs to define the SSL certificate to use for this Site. Refer to Creating Certificates and Importing a Certificate into the Trusted Certificate Database for information regarding certificates.
-
Regarding SSL certificate-based login, compliance with PCI DSS requires that users change their password upon initial login. Because SSL certificate-only login does not use a password, it potentially violates the PCI DSS and is, therefore, not available with high security-enabled Sites.
-
If you choose SFTP, click SFTP options and SFTP keys for further configuration. Because the SFTP Public key only method does not use a password, it potentially violates the PCI DSS and is, therefore, not available with high security-enabled Sites. However, you can use the Public Key and Password authentication method.
-
If you choose AS2 over HTTP/S, click Configure to specify your AS2 identifier and certificate information.
-
Click Next. If the default SFTP banner message is used on EFT, the Vendor Default warning page appears. Do one of the following:
-
Click Change SFTP message banner to, then provide the software version and, optionally, comments.
-
Click Continue without making any changes, then type the reason for keeping the default banner message.
-
Click Next. The Site Setup Completed page appears.
-
You are offered the option of continuing to the User Creation wizard or quitting the wizard. Click an option, and then click Finish. The high security-enabled Site appears in the tree on the Server tab.
-
If you chose Run New User Creation wizard, the User Creation wizard Welcome page appears.
- OR -